

Clone Windows 11 to an NVMe SSD, verify the new drive, then boot from it after changing the correct UEFI setting.
Learning how to migrate Windows 11 to NVMe SSD can make an older PC feel new without reinstalling apps, settings, or personal files. The process is safe when you prepare a backup, check boot mode, and use reliable cloning software. This guide explains each step in plain language, including common errors, BitLocker concerns, BIOS settings, and what to do if the cloned SSD will not boot.
What Does Migrating Windows 11 to an NVMe SSD Mean?
Migrating Windows 11 means moving the operating system, boot files, applications, settings, and personal data from your current drive to a faster NVMe solid-state drive. The usual method is disk cloning.
An NVMe SSD uses the PCIe interface. It can deliver much faster read and write speeds than a traditional hard disk drive and may also outperform an older SATA SSD. However, the real-world improvement depends on your computer, workload, PCIe generation, and the health of the source drive.
When you migrate Windows 11 to NVMe SSD, the goal is to create a copy that starts exactly like the old installation. You should see the same desktop, files, programs, and Windows activation after the switch.

Why Move Windows 11 to an NVMe SSD?
An NVMe SSD can reduce boot times and improve system response. Large programs may open faster, and file transfers can feel smoother. Games may also load more quickly, although an NVMe drive does not automatically increase graphics performance or frame rates.
Here are the main benefits:
• Faster Windows 11 startup and shutdown
• Quicker application launches
• Better performance when moving large files
• Less noise because NVMe SSDs have no moving parts
• Lower power use than many mechanical hard drives
• More free space if your old drive is small
• A simpler upgrade than reinstalling Windows from scratch
A clean Windows installation is sometimes the best choice, especially if the old system has years of unused software or errors. Still, cloning is more convenient because it preserves your current setup.
In my experience, cloning saves the most time when a computer contains specialized programs, custom settings, or work files. The mistake many people make is treating the process like a simple file copy. Windows needs hidden EFI, recovery, and system partitions too.

Check Compatibility Before You Begin
Before you migrate Windows 11 to NVMe SSD, confirm that the new drive and computer work together. Most modern desktops and laptops support NVMe, but physical size and firmware support can vary.
Check these items:
• NVMe slot: Confirm that your motherboard or laptop has an M.2 slot that supports NVMe, not only M.2 SATA.
• Drive size: Many laptops use the 2280 M.2 format, but some use shorter 2242 drives.
• PCIe support: A PCIe 4.0 SSD can work in many PCIe 3.0 slots, but it will run at the slower supported speed.
• Capacity: The new SSD must have enough usable space for the data on the old Windows drive.
• Heat control: Some high-speed NVMe drives need a heatsink, especially in desktops.
• Firmware: Update the motherboard or laptop firmware only when necessary and follow the manufacturer’s instructions.
Open Disk Management in Windows to check how much space the old drive uses. The target SSD does not always need to match the old drive’s total capacity. It only needs enough room for all selected partitions and data.
You should also confirm that Windows uses UEFI mode and a GPT partition style. Windows 11 normally uses this setup because Microsoft requires UEFI and Secure Boot support on compatible systems.

Prepare Windows 11 for the Migration
Good preparation prevents most cloning problems. Do not begin until your important files exist in a separate backup.
Complete these tasks first:
Back up documents, photos, browser data, and other important files to an external drive or trusted cloud service.
Save recovery keys, especially your BitLocker recovery key.
Install pending Windows updates, then restart the computer.
Remove temporary files to reduce the amount of data being cloned.
Uninstall programs you no longer use if the target SSD has limited capacity.
Run a malware scan with Windows Security or another trusted security tool.
Connect the computer to power. Do not clone a laptop while it relies only on battery power.
Close programs before cloning begins.
If BitLocker or device encryption is active, check its status in Windows Settings or Control Panel. You can often clone an encrypted drive, but some cloning tools handle encryption better than others.
For a smoother migration, temporarily suspend BitLocker protection before cloning. Do not delete encryption or format the old drive yet. Keep the old drive untouched until the new SSD starts Windows correctly for several days.
Choose a Reliable Windows 11 Cloning Tool
The cloning software creates a sector-aware copy of the Windows installation. It should copy the boot partition, Microsoft Reserved partition, Windows partition, and recovery partition.
Common options include:
• SSD manufacturer migration software: Some brands provide free tools for copying Windows to their drives.
• Windows backup tools: These can create system images, but restoring an image may take more steps than direct cloning.
• Third-party disk cloning software: These tools often provide partition resizing, disk layouts, and boot repair features.
Use software from a trusted developer or the SSD manufacturer. Download it from the official website, and read the target disk selection carefully.
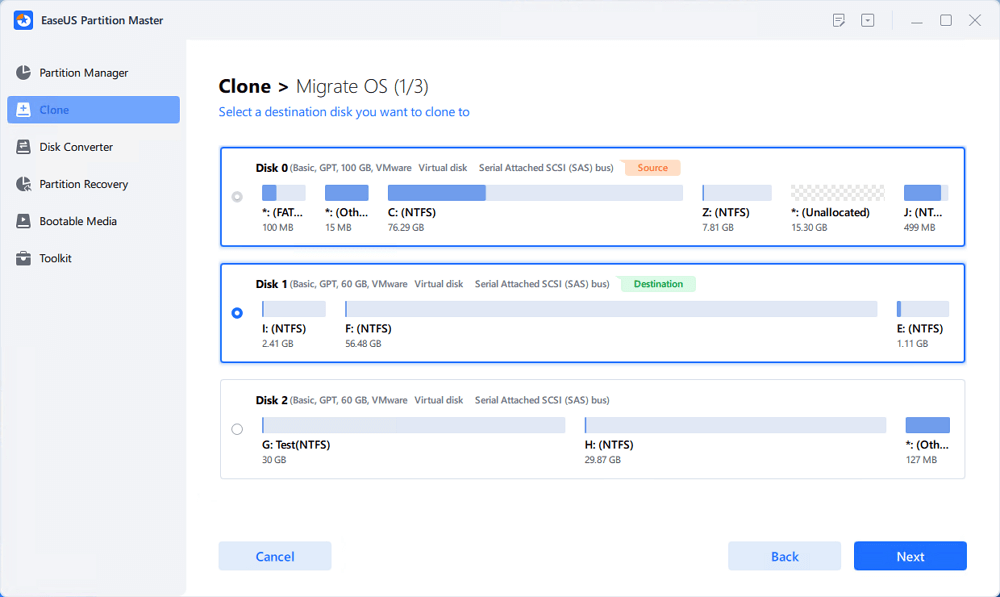
The most important screen is the source and destination selection. The source is your old Windows drive. The destination is the new NVMe SSD. Selecting the wrong disk can erase valuable data, so slow down at this point.

How to Migrate Windows 11 to NVMe SSD by Cloning
The following process explains how to migrate Windows 11 to NVMe SSD with a standard cloning tool. The names of buttons may differ, but the basic steps remain similar.
1. Install the NVMe SSD
Shut down the computer completely and disconnect the power cable. For a laptop, follow the manufacturer’s service instructions and disconnect the battery when the design allows it.
Insert the NVMe drive into the M.2 slot at a slight angle. Press it down gently and secure it with the correct screw. Never force the drive into the slot.
Start Windows and open Disk Management. If Windows asks to initialize the disk, choose GPT when available. Do not create or format partitions if your cloning software will manage the entire disk.
2. Start the cloning software
Open the cloning program with administrator permission. Choose the old Windows drive as the source disk.
Make sure every required partition is selected. A typical Windows 11 installation may include:
• EFI System Partition
• Microsoft Reserved Partition
• Windows operating system partition
• Recovery partition
Some tools automatically select all partitions. If the target SSD is smaller than the old drive, use the resize option to reduce the main Windows partition before cloning.
3. Select the NVMe SSD as the destination
Choose the new NVMe drive as the destination. Carefully compare disk capacity and model names. The destination disk will usually be erased during this step.
If the software shows an option such as “optimize for SSD” or “4K alignment,” enable it. Proper alignment helps the SSD work efficiently and supports consistent performance.
Avoid manually copying only the C: drive. Windows may fail to boot if the EFI or recovery partitions are missing.
4. Begin the clone
Start the cloning process and wait until it finishes. The time can range from several minutes to a few hours, depending on the amount of data and the speed of both drives.
Do not browse files, install updates, or unplug the computer during cloning. An interruption can leave the target disk incomplete.
5. Shut down after cloning
When the software reports success, shut down the computer instead of immediately continuing to use Windows from the old drive. The next step is to test the new SSD as the boot device.

Make the NVMe SSD the Boot Drive
After cloning Windows 11, the computer may still start from the old drive. You need to change the boot order or temporarily remove the old drive.
The safest test is to shut down and disconnect the old drive. On a desktop, disconnect its data or power cable. On a laptop with one storage slot, the old drive must be replaced by the cloned NVMe SSD.
Start the computer and enter UEFI firmware settings. Common keys include Delete, F2, F10, or F12, but the correct key depends on the manufacturer.
In the boot section, choose the Windows Boot Manager entry linked to the NVMe SSD. Do not select only the raw drive name if a Windows Boot Manager option is available.
Save the settings and restart. If the migration worked, Windows 11 should load with your existing account, desktop, apps, and files.
Once Windows starts, open Task Manager and check the Performance tab. The new SSD should appear under the disk list. You can also open Disk Management and confirm that the Windows partitions are on the NVMe drive.

What to Do If the Cloned NVMe SSD Will Not Boot
A failed boot does not always mean the clone is damaged. The most common causes are incorrect boot order, missing boot files, a wrong firmware mode, or a poor clone.
Try these fixes in order:
• Recheck the UEFI boot order and select Windows Boot Manager on the NVMe SSD.
• Confirm that the firmware uses UEFI mode rather than Legacy or Compatibility Support Module mode.
• Check that the cloned disk uses GPT, not MBR.
• Reconnect the old drive only after testing the new drive alone.
• Use Windows Startup Repair from a Windows 11 installation USB.
• Re-run the cloning process and confirm that all system partitions are included.
• Check for a firmware update for the motherboard or laptop.
Windows recovery tools can sometimes rebuild boot files. Start from Windows installation media, choose Repair your computer, then open Troubleshoot and Advanced options. Startup Repair is the simplest option to try first.
If Startup Repair does not help, Command Prompt tools such as bcdboot may rebuild the boot environment. Use these commands only when you understand the drive letters shown in the recovery environment. They can differ from the letters used inside normal Windows.
Expand the Windows Partition After Migration
If the new NVMe SSD is larger than the old drive, Windows may leave unallocated space at the end of the disk. You can use it to expand the C: drive.
Open Disk Management and look for unallocated space immediately after the Windows partition. Right-click the C: drive and select Extend Volume if the option is available.
The space must usually be directly next to the partition for Windows Disk Management to extend it. If a recovery partition sits between the C: drive and the unallocated space, you may need a trusted partition manager.
Do not delete the recovery partition without a clear reason. It can help repair Windows when startup problems occur.

Re-enable BitLocker and Check Windows Activation
If you suspended BitLocker before migration, re-enable protection after confirming that Windows runs from the NVMe SSD. Store the updated recovery key in a safe location.
Changing the storage drive normally does not remove Windows activation because activation is often linked to the device’s digital license and hardware. Still, open Settings, select System, and check the Activation page.
Also verify the following:
• Windows 11 starts without a recovery prompt.
• Your files open normally.
• Device Manager shows no storage or chipset warning.
• Wi-Fi, sound, graphics, and Bluetooth work correctly.
• Your main programs open as expected.
• The old drive is still readable if you plan to keep using it.
If Windows asks for a BitLocker recovery key, enter the saved key. This request can happen after a hardware change or firmware setting change. It does not necessarily indicate a failed migration.
Safely Reuse or Erase the Old Drive
Do not erase the old drive immediately. Use the NVMe SSD as your only boot drive for at least a few days. Test work files, applications, printers, games, and backup tools.
Once you are certain the migration worked, you can reuse the old drive for extra storage. Before erasing it, confirm that no needed files remain.
To wipe the old drive:
Open Disk Management.
Identify the old drive by its model and capacity.
Delete its old partitions only after checking the disk carefully.
Create a new simple volume.
Format it with NTFS for normal Windows storage.
For sensitive data, a standard quick format may not be enough. Use the drive maker’s secure erase tool when appropriate. SSDs handle deleted data differently from hard drives, so repeated overwriting is not always the best method.
Common Mistakes to Avoid
Knowing what not to do is an important part of learning how to migrate Windows 11 to NVMe SSD.
Avoid these mistakes:
• Cloning without a separate backup
• Selecting the old drive as the destination
• Copying only personal files instead of the full system disk
• Ignoring BitLocker recovery information
• Using Legacy mode after cloning a GPT Windows installation
• Removing the old drive before testing the new one
• Interrupting the clone because the progress appears slow
• Formatting the source drive too soon
• Installing an NVMe drive in an incompatible M.2 slot
• Forgetting to expand the Windows partition when extra capacity is available
In one common upgrade scenario, the clone completed successfully but the computer kept loading the old drive. The solution was simple: disconnect the old drive and select the correct Windows Boot Manager entry. This is why testing with only the new drive connected is so useful.
Clone or Clean Install Windows 11?
Cloning is best when your current Windows installation is stable and you want to preserve your setup. It is fast, familiar, and usually avoids reinstalling applications.
A clean installation is better when Windows has serious corruption, malware, years of unused software, or unstable drivers. It also gives you a fresh partition layout and removes old system clutter.
Choose cloning when:
• Your current installation works well.
• You have many programs to preserve.
• You need the shortest downtime.
• The new SSD has enough capacity.
Choose a clean install when:
• Windows has repeated errors.
• The old installation contains unwanted software.
• You want a fresh start.
• The source disk may be failing.
Before choosing either method, verify that your license, application installers, passwords, and files are available. A clean install can solve problems, but it requires more preparation.
Performance Tips After the Upgrade
After you migrate Windows 11 to NVMe SSD, allow Windows to manage routine SSD maintenance. Windows uses TRIM to help the drive handle deleted data efficiently.
You can check optimization settings by opening “Defragment and Optimize Drives.” Windows may display the NVMe drive as a solid-state drive and schedule optimization automatically.
Other useful tips include:
• Keep at least 10% to 20% of the drive free when practical.
• Install the latest stable chipset and storage drivers.
• Use the SSD manufacturer’s utility to check firmware and health.
• Avoid installing unknown “SSD booster” programs.
• Keep Windows and security software updated.
• Maintain a separate backup because an SSD can fail without warning.
NVMe speed is most noticeable during heavy file transfers, software builds, video work, and large game loads. Everyday browsing may feel faster, but the difference is often smaller than benchmark numbers suggest.
How Long Does the Migration Take?
The time depends on how much data must be copied and how fast the source drive can read it. A system with 150 GB of data may finish in under an hour, while a nearly full drive can take much longer.
Plan extra time for:
• Installing the NVMe drive
• Updating firmware if needed
• Cloning the disk
• Testing the new boot drive
• Resizing partitions
• Reinstalling or repairing software if necessary
Do not judge success only by the cloning progress bar. The real test is whether the NVMe SSD boots independently and runs your normal programs without errors.
Frequently Asked Questions About How to Migrate Windows 11 to NVMe SSD
Can I migrate Windows 11 to an NVMe SSD without reinstalling it?
Yes. Disk cloning can copy the Windows installation, boot files, applications, and personal data to the NVMe SSD. The target drive must have enough space and must be connected correctly.
Will cloning Windows 11 erase the old drive?
No. Cloning normally leaves the source drive unchanged. The destination NVMe SSD is the drive that may be erased, so check the source and destination selections carefully.
Can I migrate Windows 11 to a smaller NVMe SSD?
Yes, if the amount of used data fits on the smaller drive. You may need to shrink the Windows partition before starting the clone.
Do I need to disable BitLocker before cloning?
Not always, but suspending BitLocker can reduce compatibility problems with some cloning tools. Save the recovery key first, and re-enable protection after confirming that the new SSD boots correctly.
Why does the cloned NVMe SSD not appear in the boot menu?
The drive may not have been cloned with its EFI partition, or the firmware may be using the wrong boot mode. Check for a Windows Boot Manager entry, confirm UEFI and GPT settings, and run Startup Repair if needed.
Can I use the old drive after moving Windows 11?
Yes. Keep it untouched until the new NVMe SSD works reliably. You can then format the old drive and use it for files, backups, or secondary storage.
Does an NVMe SSD make Windows 11 faster than a SATA SSD?
It can improve boot times, file transfers, and demanding workloads, but the difference varies by computer and task. For everyday browsing, the change may be less dramatic than the difference between a hard drive and any SSD.
Conclusion
Migrating Windows 11 to an NVMe SSD is a practical way to gain faster storage without rebuilding your entire computer. Back up your files, check NVMe compatibility, clone every required Windows partition, select the correct UEFI boot entry, and keep the old drive until the upgrade is proven.
The safest approach is careful rather than rushed. Follow each step, verify the drive model before formatting anything, and keep your BitLocker recovery key close. If this guide helped, explore your SSD manufacturer’s support resources and share your migration experience in the comments.
