

Cloning an SSD copies your entire drive, including Windows, apps, files, and settings, to a new SSD.
Knowing how to clone to an SSD can save hours of reinstalling Windows, restoring files, and rebuilding your preferred settings. The process is safe when you check the new drive’s capacity, create a backup, use reliable cloning software, and confirm the correct boot settings. This guide explains how to clone to an SSD step by step, including preparation, software choices, troubleshooting, and what to do after the upgrade.
What Does Cloning an SSD Mean?
SSD cloning creates an exact copy of one storage drive on another. The copy can include the operating system, boot files, applications, personal files, user accounts, and system settings.
Think of it like making a working duplicate of your computer’s entire home. You are not just moving a few boxes. You are copying the doors, wiring, furniture, and house keys so the new drive can start the computer in the same way.
When you clone to an SSD, the new drive usually becomes a replacement for the old hard drive or SSD. This is different from copying files manually because a simple file transfer may not copy hidden boot partitions or operating system data.
Cloning is useful when you want to:
• Replace a slow hard disk drive with a faster SSD
• Upgrade to a larger SSD
• Move Windows to an NVMe SSD
• Keep your current applications and settings
• Avoid reinstalling the operating system
• Preserve a familiar work environment
Cloning is not the same as a backup. A backup stores a recoverable copy of your data. A clone is designed to create a usable replacement drive. You should still maintain a separate backup before starting.
Before You Clone to an SSD
Good preparation prevents most cloning problems. Before you learn how to clone to an SSD, check the source drive, target drive, connection type, and available storage.
Check the new SSD capacity
The target SSD must have enough usable space for the data on the source drive. It does not always need to be larger than the old drive, but it must hold the amount of data being cloned.
For example, a 1 TB hard drive with only 300 GB of used space can often be cloned to a 500 GB SSD. However, a 500 GB source drive with 450 GB of used space may not fit comfortably on a 500 GB SSD because manufacturers calculate capacity differently and the cloning tool may need extra space.
Check the used space in Windows:
- Open File Explorer.
- Select “This PC.”
- Right-click the source drive.
- Choose “Properties.”
- Note the used space and free space.
Leave extra room on the new SSD if possible. An SSD works best when it is not nearly full.
Back up important files
Copy your important documents, photos, work files, browser data, and other personal items to an external drive or trusted cloud service.
A cloning error is uncommon, but it can happen because of failing hardware, power loss, bad cables, or user mistakes. A backup gives you a safe way back if something goes wrong.
Check the connection
You may need one of these connections:
• SATA data and power cables for a desktop computer
• A USB-to-SATA adapter for a 2.5-inch SATA SSD
• An M.2 slot for an NVMe SSD
• A compatible USB NVMe enclosure
• A drive dock or external enclosure
Do not assume every M.2 SSD uses the same connection. M.2 SATA and M.2 NVMe drives can look similar, but they use different communication standards.
Confirm drive health
Before cloning, check the source drive for errors. On Windows, open Command Prompt as an administrator and run:
chkdsk C: /scan
You can also review the drive’s health with a trusted monitoring tool that reads S.M.A.R.T. data. If the old drive shows warnings, clone it as soon as possible and keep several backups.
:max_bytes(150000):strip_icc()/11-how-to-clone-hdd-to-ssd-in-windows-4775671-57a6438d638a42059887668dae292424.jpg)
Choose Reliable SSD Cloning Software
The software you use is one of the most important parts of learning how to clone to an SSD. Many SSD manufacturers offer cloning tools for their own drives. Some backup applications also support disk cloning.
Common options include:
• Manufacturer-provided migration software
• Disk imaging and cloning programs
• Rescue media tools that run from a USB drive
• Built-in operating system backup tools, when supported
Use software from a reputable developer. Avoid random downloads that promise “one-click cloning” but bundle unwanted programs or hide important settings.
A good cloning tool should let you:
• Select the source disk clearly
• Select the target disk clearly
• Copy all required system partitions
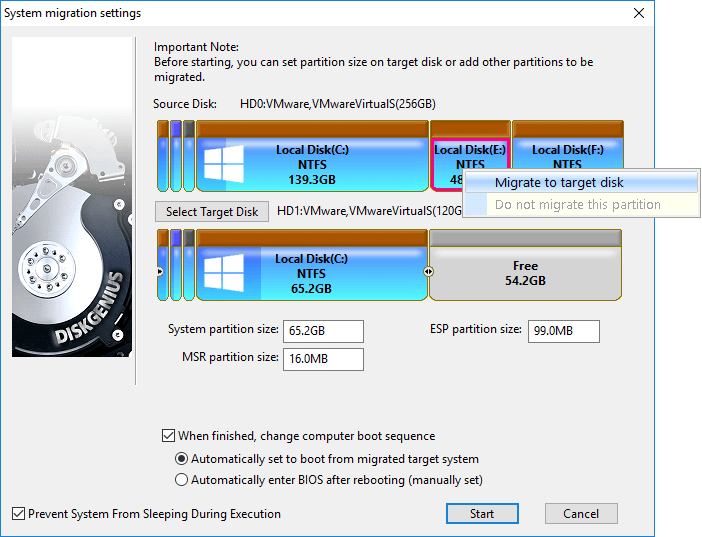
• Resize partitions on the new SSD
• Use sector-by-sector cloning when needed
• Create bootable rescue media
• Verify the clone after completion
Some tools offer free cloning for basic disk-to-disk upgrades, while others require a paid edition. Check the current license terms before installing.
Avoid the most common software mistake
The source drive is the drive you are copying from. The target drive is the drive you are copying to.
Choosing the wrong direction can erase the original drive. Before clicking “Start,” compare the disk size, model number, and partition layout. I recommend unplugging other external drives during the process if they are not needed. Fewer visible drives mean fewer chances to select the wrong one.
How to Clone to an SSD on Windows
The exact buttons differ between cloning programs, but the overall process is similar. These steps explain how to clone to an SSD using a typical Windows disk cloning tool.
1. Install the new SSD
Connect the SSD to the computer. If it is an internal drive, turn off the computer, disconnect power, and follow the manufacturer’s installation instructions.
For a laptop, you may connect the new SSD through a USB adapter before replacing the internal drive. For a desktop, install the SSD in an open drive bay or compatible M.2 slot.
2. Initialize the SSD if Windows requests it
Open Disk Management by right-clicking the Start button and selecting “Disk Management.”
If Windows asks you to initialize the disk, choose the partition style that matches your system:
• GPT is the normal choice for modern UEFI computers
• MBR may be needed for older BIOS-based systems
Do not create random partitions if your cloning software will manage the target disk. Some tools can clone directly to an unallocated drive.
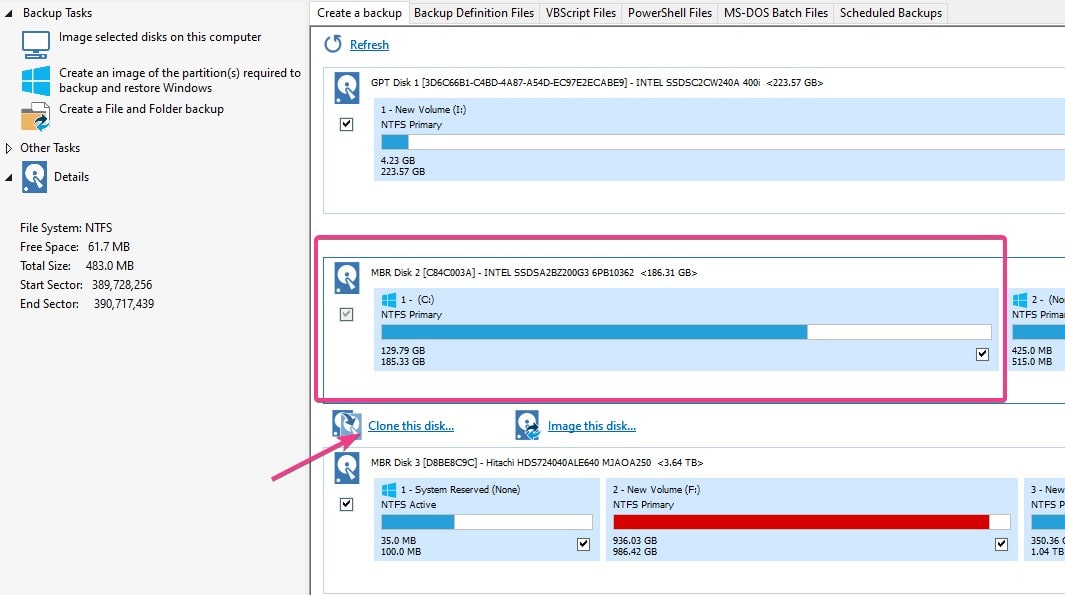
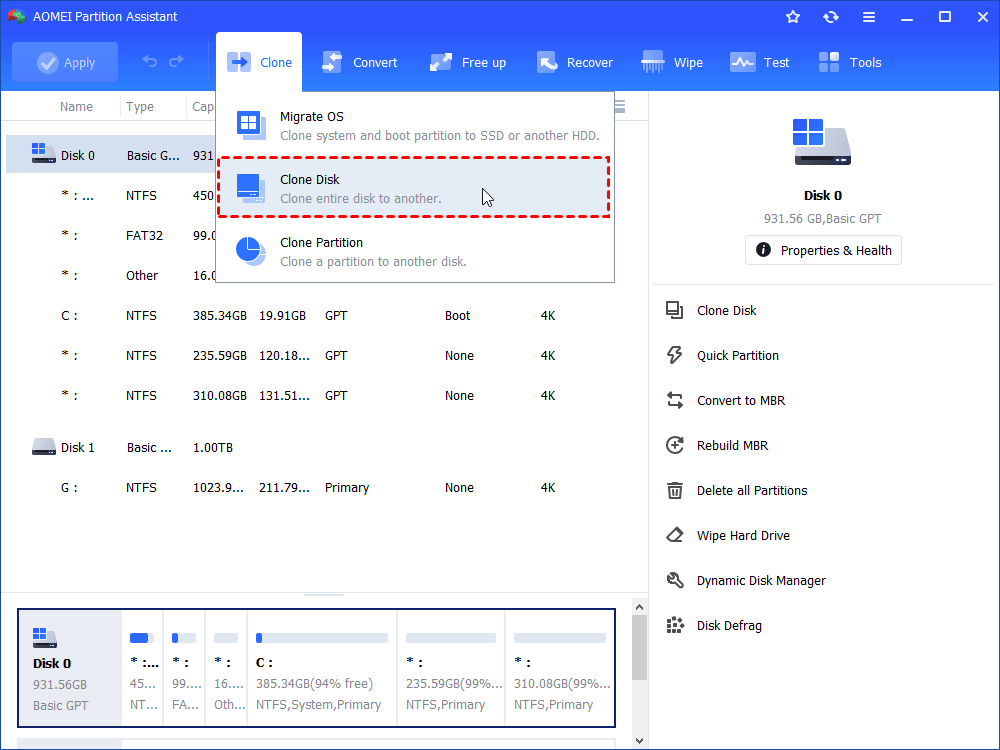
3. Open the cloning program
Start the cloning application as an administrator. Look for an option such as:
• Clone disk
• Migrate OS
• Disk copy
• Drive migration
• Clone this disk
Select the old drive as the source. Confirm its model number and capacity.
4. Select the new SSD as the destination
Choose the new SSD as the target. Check its model number and make sure it does not contain files you need.
Many cloning programs show a warning that the target drive will be erased. Read that warning carefully. If the target has important files, stop and copy them elsewhere first.
5. Copy all required partitions
A Windows installation often includes more than the visible C: drive. It may also contain:
• EFI System Partition
• Microsoft Reserved partition
• Windows recovery partition
• Main Windows partition
• Manufacturer recovery partition
Copy the full disk layout unless you have a specific reason not to. Missing the EFI or boot partition can make the clone unable to start Windows.
6. Resize the main partition if needed
If the new SSD is larger, expand the Windows partition so you can use the extra space. Some tools do this automatically. Others provide a layout screen where you drag the partition edge.
If the new SSD is smaller, reduce the source partition before cloning. Windows Disk Management can shrink a partition, but files near the end of the volume may limit how much it can shrink.
7. Start the clone
Close open applications and begin the process. Do not use the computer heavily while cloning.
The time required depends on the amount of data, drive speed, USB connection, and cloning method. A clone may take 20 minutes or several hours. Do not interrupt it unless the program clearly reports an error.
8. Shut down after completion
When the cloning program reports success, shut down the computer completely. Do not immediately format or erase the old drive.
Keep the original drive untouched until the new SSD boots correctly and you confirm that your files and applications work.
:max_bytes(150000):strip_icc()/09-how-to-clone-hdd-to-ssd-in-windows-4775671-683efbe668244622b97a8b6bc875713f.jpg)
How to Boot From the Cloned SSD
After cloning, the computer may still try to boot from the old drive. You may need to change the boot order.
Option 1: Replace the old drive
If you are upgrading a laptop or replacing the primary desktop drive, turn off the computer and install the cloned SSD in the old drive’s position.
Start the computer. If the clone is correct, Windows should load with your normal desktop, applications, and files.
Option 2: Change the boot order
If both drives remain installed:
- Restart the computer.
- Open the firmware setup screen.
- Press the displayed key, often Delete, F2, F10, or Esc.
- Open the Boot menu.
- Select Windows Boot Manager on the new SSD.
- Save the changes and restart.
The key varies by computer brand. The boot menu may list the SSD by model number or show “Windows Boot Manager.”
Check that you booted from the new drive
In Windows, open Disk Management and identify which disk contains the active Windows partition. You can also open Task Manager, select “Performance,” and review the disk model.
Do not erase the old drive until you have tested the new SSD for at least a few days. This simple waiting period has prevented many stressful recoveries.
What to Do After Cloning
The cloning process is not finished when Windows starts. Complete these checks before relying on the new SSD.
Confirm your files
Open several folders and files. Test documents, photos, videos, project files, and any data stored outside the usual user folders.
Test important applications
Launch the programs you use most. Check office tools, creative software, games, development tools, printers, and other devices.
Some applications may ask you to sign in again. This can happen because security software detects a hardware change.
Check the partition size
Open File Explorer and confirm that the new SSD shows the expected free space. If the SSD is larger but the extra space is unallocated, use Disk Management or the cloning software to extend the main partition.
Update firmware and drivers
Install current SSD firmware only through a trusted manufacturer tool. Also check for chipset, storage, and motherboard firmware updates when needed.
Do not update firmware during a storm or unstable power conditions. A failed firmware update can make a drive unusable.
Enable the right power settings
Modern Windows systems usually manage SSD power settings automatically. Keep standard settings unless you have a specific performance or battery problem.
Never use a traditional disk defragmentation routine on an SSD as if it were a hard drive. Windows normally handles SSD optimization with the Trim command.
Reuse the old drive carefully
Once the new SSD is stable, you can format the old drive and use it for extra storage. First verify that:
• Windows boots without the old drive connected
• Your important files exist on the new SSD or backup
• Your recovery options are available
• You no longer need the old drive as an emergency fallback

How to Clone to an SSD on a Mac
The process differs on macOS because Apple computers use different startup systems and security features.
For a modern Mac, the best approach may be creating a full backup with Time Machine or using a startup-capable migration method supported by your Mac model and macOS version. Newer Apple silicon Macs also use a different startup architecture than older Intel Macs.
For an Intel Mac, Disk Utility can copy volumes in some situations, but a bootable external clone may require software that supports the current macOS version and Apple File System. FileVault encryption, System Integrity Protection, and macOS security changes can affect whether an external clone will boot.
Before attempting a Mac clone:
• Check whether the Mac uses Intel or Apple silicon
• Confirm the target drive uses a compatible format
• Create a current Time Machine backup
• Check the cloning tool’s support for your macOS version
• Follow the software maker’s startup instructions
Do not assume a method that worked on an older Intel Mac will work on a new Apple silicon Mac. The hardware and boot process are different.

Common SSD Cloning Problems and Fixes
Even when you understand how to clone to an SSD, a few problems can appear. Most have a clear cause.
The target SSD is too small
The target needs enough space for the data being copied, not simply the same advertised capacity. Delete unnecessary files, empty the recycle bin, and shrink the source partition before cloning.
If the source drive contains many large files, move them temporarily to another drive.
The cloned SSD will not boot
This often happens when the boot partition was not copied or the firmware mode does not match the clone.
Try these steps:
• Confirm that all system partitions were cloned
• Set the new SSD as the first boot device
• Check whether the computer uses UEFI or legacy BIOS
• Run Windows Startup Repair from Windows installation media
• Rebuild the boot files with a trusted recovery procedure
Do not format the source drive while troubleshooting.
Windows shows the wrong drive letter
Windows may assign a different letter when both drives are connected. This does not always mean the clone failed.
Shut down, disconnect the old drive, and boot with only the new SSD installed. Windows should normally assign the expected system drive letter.
The SSD is not detected
Check the physical connection first. For SATA drives, inspect both the data and power cables. For M.2 drives, confirm that the slot supports the drive type.
Some M.2 slots support NVMe only, SATA only, or share bandwidth with other ports. Your computer or motherboard manual can confirm compatibility.
The clone stops with a read error
A read error may indicate damaged sectors on the source drive. Stop using the source drive for unnecessary work and make a backup of readable files.
Some cloning tools offer a recovery or “ignore bad sectors” option. Use that setting carefully because it may create an incomplete clone. If the source drive is failing, professional data recovery may be safer than repeated cloning attempts.
The new SSD feels no faster
Check that Windows is actually running from the SSD. Also confirm that the drive is connected through the correct interface and that the system supports its rated speed.
A SATA SSD will not reach NVMe speeds, even if it is installed in a computer with an M.2 slot. Performance also depends on the motherboard, PCIe generation, thermal conditions, and workload.
Safety Tips for a Successful SSD Clone
A few careful habits make how to clone to an SSD much safer.
• Back up important files before starting
• Connect the computer to reliable power
• Close applications before cloning
• Verify source and target disks by model number
• Keep the old drive unchanged until testing is complete
• Use a direct connection instead of a low-quality USB hub
• Do not interrupt the process without a clear error
• Keep recovery media available
• Use encryption recovery keys if BitLocker or FileVault is enabled
• Record important passwords and application licenses
BitLocker deserves special attention. Windows may ask for a recovery key after a hardware or boot change. Save the key before starting, especially if the computer uses device encryption.
A common mistake is rushing because the cloning software looks simple. The buttons may be simple, but the disk selection is serious. Take a photo or note of each drive’s model number before you begin.
When Cloning Is Not the Best Choice
Cloning is convenient, but it is not always the right method.
A clean installation may be better when:
• The old Windows installation has years of clutter
• Malware may be present
• System files are badly damaged
• You are changing from BIOS to UEFI
• You want a fresh start
• The source drive has serious corruption
• You are moving to very different hardware
Cloning also copies problems. If the old installation has broken drivers, unwanted programs, or malware, those issues move to the SSD.
For a healthy computer that needs a storage upgrade, cloning is usually efficient. For a troubled computer, a clean installation can provide a better foundation.
Frequently Asked Questions About How to Clone to an SSD
Can I clone a larger drive to a smaller SSD?
Yes, if the actual used data fits on the smaller SSD. You may need to delete files or shrink the source partition before starting the clone.
Does cloning copy Windows and installed programs?
Yes. A full disk clone can copy Windows, installed programs, user accounts, settings, boot files, and personal data. The result should look and work like the original installation when the clone is successful.
Can I use my computer while cloning?
You can, but it is better to avoid heavy use. Open files may change during the process, and heavy activity can slow the clone or create consistency issues.
Should I keep the old drive after cloning?
Keep it until the new SSD boots correctly and your important files and applications work. After a testing period, you can erase the old drive and reuse it or store it as an emergency backup.
Why does my cloned SSD not boot?
The boot partition may not have been copied, the wrong disk may be selected in firmware, or the source and target may use different boot modes. Check the boot order, confirm that all system partitions were cloned, and use Windows recovery tools if needed.
Do I need to format the new SSD before cloning?
Usually, no. Many cloning applications erase and prepare the target disk during the process. If you format it first, use the partition style that matches your computer, such as GPT for most modern UEFI systems.
Is cloning better than reinstalling Windows?
Cloning is faster and preserves your existing setup. A clean installation takes more time but can remove old software, corrupted settings, and other system problems.
Can I clone an encrypted drive?
Often, yes, but encryption can affect the process and the first boot. Save your BitLocker or FileVault recovery key, and use cloning software that clearly supports encrypted volumes.
Conclusion
Learning how to clone to an SSD lets you upgrade storage without rebuilding your entire computer from scratch. The safest process is to back up your files, check the SSD’s capacity and connection, select the correct source and target, copy every required partition, and test the new drive before erasing the old one.
Cloning works best when the source system is healthy and the new SSD is compatible. Take your time at the disk selection screen, keep a recovery option ready, and treat the original drive as your safety net until everything works.
Ready to improve your computer’s speed and storage? Choose a compatible SSD, create a backup, and follow the steps above carefully. Share your cloning experience or explore your SSD manufacturer’s support resources for model-specific guidance.
