

To install an SSD in a PC, back up your files, connect the drive, secure it, and set it up in Windows.
Learning how to install a SSD in PC is one of the best upgrades you can make. An SSD can shorten boot times, speed up app loading, and make an older computer feel new again. This guide explains the process for both 2.5-inch SATA SSDs and M.2 NVMe drives, with clear steps, safety tips, and setup advice.
Why Install an SSD in a PC?
A solid-state drive stores data on flash memory instead of spinning disks. This design makes an SSD faster, quieter, cooler, and more resistant to movement than a traditional hard disk drive.
When you install a SSD in PC, you may notice improvements such as:
• Faster Windows startup
• Quicker game and app loading
• Better file transfer performance
• Less noise because there are no moving parts
• Lower power use in some systems
• Improved responsiveness during multitasking
A SATA SSD is often three to five times faster than a hard drive in everyday use. An NVMe SSD can be much faster still, especially when moving large files or running demanding creative apps. However, your real-world speed also depends on the motherboard, processor, software, and workload.
In my experience, replacing a slow hard drive gives the biggest noticeable improvement on an older desktop. Upgrading from a SATA SSD to a faster NVMe drive is useful, but the change may be less obvious during simple tasks such as web browsing.

Choose the Right SSD for Your PC
Before you learn how to install a SSD in PC, confirm which type of drive your computer supports. The two main choices are SATA and NVMe.
2.5-inch SATA SSD
A 2.5-inch SATA SSD uses two connections:
• A SATA data cable that connects to the motherboard
• A SATA power cable from the power supply
Most desktop computers support this type of drive. It is a good choice for older PCs, budget upgrades, and systems without an available M.2 slot.
M.2 NVMe SSD
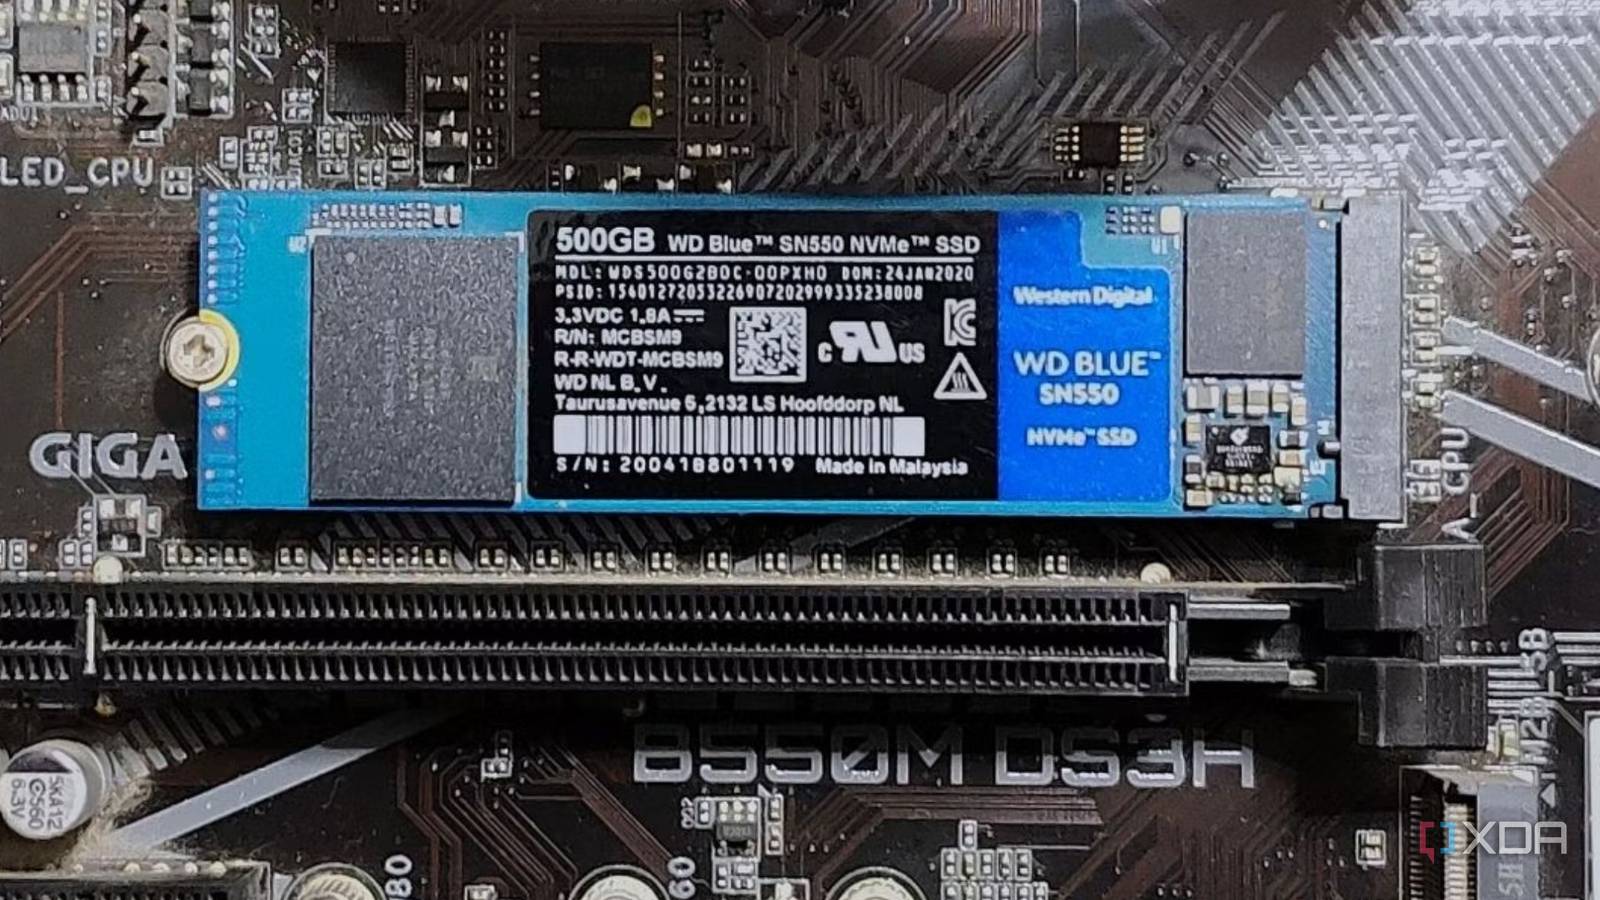
An M.2 NVMe SSD is a small circuit board that fits directly into an M.2 slot on the motherboard. It usually needs no data cable. A small screw holds it in place.
NVMe drives use the PCIe interface and are usually faster than SATA SSDs. Check your motherboard manual before buying one because M.2 slots can support different protocols, sizes, and PCIe generations.
Check compatibility
Look for these details before purchasing:
• Whether the motherboard has an M.2 slot
• Whether that slot supports NVMe, SATA, or both
• The supported M.2 size, such as 2280
• Available SATA ports for a 2.5-inch drive
• Whether the power supply has a free SATA power connector
• Whether the PC case has a 2.5-inch mounting point
An M.2 drive labeled 2280 is 22 millimeters wide and 80 millimeters long. This is the most common size in desktop PCs, but it is still worth checking.

What You Need Before Installation
Gather the tools and information before opening the computer. Preparation makes the installation easier and reduces the chance of damaging a part.
You may need:
• The new SSD
• A Phillips screwdriver
• A SATA data cable for a 2.5-inch SSD
• A free SATA power connector
• Your motherboard manual
• A USB flash drive with Windows installation media, if needed
• A second storage device for backup
Back up important photos, documents, game saves, and work files first. Drive installation is normally safe, but mistakes can happen. A backup also protects you if you plan to clone your old drive.
Shut down the PC fully. Turn off the power supply, unplug the power cable, and press the case power button for a few seconds. Work on a clean table, and touch the metal chassis before handling components to reduce static electricity.
Avoid working on carpet if possible. Do not force a connector or press on the center of an M.2 drive. Computer parts are sturdy when handled correctly, but small connectors and circuit boards can be damaged by excess pressure.

How to Install a 2.5-Inch SATA SSD
A 2.5-inch SATA SSD is easy to install in most desktop computers. Follow these steps carefully.
1. Open the PC case
Remove the side panel from the computer case. Some cases use thumbscrews, while others use a rear latch or standard screws.
Place the panel somewhere safe. Keep the screws in a small container so they do not roll under your desk.
2. Find a mounting location
Look for a 2.5-inch SSD tray, bracket, or mounting holes. Some cases let you attach the SSD behind the motherboard tray. Others use a larger 3.5-inch drive cage with an adapter.
The SSD does not contain moving parts, so it is less sensitive to position than a hard drive. Still, secure it firmly so cables do not pull on the connectors.
3. Secure the SSD
Place the drive in the bracket with the connectors facing toward the cable openings. Use the correct screws supplied with the case or drive bracket.
Do not overtighten the screws. Tighten them until the drive is stable, then stop.
4. Connect the SATA data cable
Connect one end of the SATA data cable to the SSD. Connect the other end to a SATA port on the motherboard.
For the first drive, use the lowest available port if your motherboard labels ports in order. The exact port usually does not affect speed, but it can make troubleshooting easier.
5. Connect SATA power
Find a flat SATA power connector from the power supply. Plug it into the wider connector on the SSD.
The data and power connectors are shaped so they fit only one way. If a cable does not slide in smoothly, check its direction instead of applying force.
6. Close the case and test the drive
Reconnect the power cable, turn on the power supply, and start the computer. If the SSD is installed correctly, the system should power on normally.
This physical process is the core of how to install a SSD in PC with a SATA drive. Windows may not show the drive yet because a new disk often needs to be initialized and formatted.
.JPG?width=1920&height=1920&fit=bounds&quality=80&format=jpg&auto=webp)
How to Install an M.2 NVMe SSD
Installing an M.2 drive is often faster than installing a SATA drive because it uses a direct motherboard connection.
1. Find the M.2 slot
Look for a small slot labeled M.2, PCIe, or NVMe on the motherboard. It is often located between the CPU socket and the main graphics card slot, although placement varies.
Some motherboards include a metal heatsink over the M.2 slot. Remove the heatsink screw and lift the cover carefully. If the cover has a thermal pad, do not remove the protective film until you are ready to install the drive.
2. Check the mounting standoff
The motherboard should have a small standoff that matches the SSD length. For a 2280 drive, the screw point should be at the 80-millimeter position.
Move the standoff if needed, but only when the PC is powered off and unplugged. Never let a loose standoff remain under the motherboard because it can cause a short circuit.
3. Insert the SSD
Hold the M.2 SSD by its edges. Align the notch on the connector with the key in the M.2 slot.
Insert the drive at about a 20- to 30-degree angle. The gold contacts should slide into the slot. Do not push the drive straight down.
4. Secure the drive
Press the free end of the SSD down until it lines up with the standoff. Use the small M.2 screw to secure it.
The drive should lie flat. If it bends sharply, stop and check the standoff position.
5. Reinstall the heatsink
If your motherboard includes an M.2 heatsink, remove the plastic film from the thermal pad. Reattach the heatsink without overtightening the screw.
A heatsink can help control temperature during long file transfers. It is not always required for basic use, but it may help prevent thermal throttling on high-speed NVMe drives.
This is the main process for how to install a SSD in PC with an M.2 drive. After installation, use the firmware and operating system tools to confirm that the computer detects it.
Set Up the SSD in Windows
After you install a SSD in PC, Windows may need to initialize the drive before you can use it.
Initialize and format a new SSD
Follow these steps:
Start Windows and sign in.
Right-click the Start button and open Disk Management.
Find the new drive. It may appear as unallocated space.
If Windows asks you to initialize the disk, choose GPT for most modern computers.
Right-click the unallocated area and select New Simple Volume.
Follow the wizard to choose a drive letter and file system.
Select NTFS for a normal Windows storage drive.
Give the drive a clear name, such as Games or Projects.
GPT is the standard partition style for modern systems using UEFI firmware. MBR may be needed for some older computers, but it has limits and is usually not the best choice for a new build.
Formatting removes existing data from the selected partition. Confirm that you have chosen the correct disk before continuing. Disk Management shows drive capacity, but compare the size carefully because Windows reports storage differently from manufacturers.
Confirm the drive speed and connection
You can check the SSD in Device Manager, Disk Management, or the manufacturer’s utility. For an NVMe drive, confirm that it appears under storage devices and that the system recognizes the expected model.
Do not expect the advertised peak speed in every test. Manufacturers measure maximum sequential performance under controlled conditions. Everyday tasks often depend more on random access, queue depth, system memory, and software behavior.
Move Windows to the New SSD
If you want the SSD to become the main system drive, you have two common options: clone the old drive or perform a clean Windows installation.
Clone the old drive
Cloning copies the operating system, apps, settings, and files to the new SSD. It is convenient when you want your current setup to remain unchanged.
Before cloning:
• Make sure the SSD has enough capacity
• Delete unnecessary files
• Run a backup
• Check for drive errors
• Connect the SSD correctly
Cloning software may need to resize the Windows partition if the new SSD is smaller than the old drive. The amount of used data must fit, and some recovery partitions may need special handling.
After cloning, shut down the PC and set the new SSD as the first boot device in the UEFI or BIOS menu. You may also disconnect the old drive for the first boot. This prevents the computer from starting from the wrong copy.
A common mistake is leaving both drives connected and assuming the system will choose the new one. If Windows starts normally but performance does not improve, check the boot order.
Perform a clean installation
A clean installation gives you a fresh Windows environment. It can remove years of unused apps, old drivers, and system clutter.
Create Windows installation media on a USB flash drive. Boot from that drive, select the new SSD during setup, and follow the prompts. Delete old partitions only when you are certain that the correct disk is selected and your files are backed up.
A clean install takes more time, but it is often the best choice for a computer with malware, serious software problems, or a heavily cluttered system.

BIOS and UEFI Settings to Check
If the SSD does not appear, check the firmware before assuming the drive is defective.
Restart the PC and press the setup key shown on the screen. Common keys include Delete, F2, F10, and F12, but the correct key depends on the motherboard.
Check these areas:
• Storage information
• NVMe configuration
• SATA controller settings
• Boot order
• UEFI or legacy boot mode
For a new Windows installation, UEFI with GPT is usually the preferred setup. Avoid changing SATA controller modes without a backup. Switching between AHCI and RAID after Windows is installed can prevent the system from booting.
If an M.2 SSD disables certain SATA ports, this should be listed in the motherboard manual. Some boards share bandwidth between the M.2 slot and SATA connectors. Moving the SATA cable to another port may solve the issue.

Common SSD Installation Problems
Even when you follow how to install a SSD in PC correctly, a few problems can appear.
The SSD is not detected
Check the following:
• The SATA data cable is connected at both ends
• The SATA power cable is connected
• The M.2 drive is fully inserted
• The M.2 screw is holding the drive flat
• The motherboard supports the SSD type
• The drive appears in UEFI or BIOS
Try another SATA cable or motherboard port if possible. For an M.2 drive, remove and reseat it carefully.
Windows sees the SSD but File Explorer does not
The drive may be uninitialized or unformatted. Open Disk Management and create a new volume, as described earlier.
The PC will not boot
Check the boot order in UEFI. If you cloned Windows, the computer may still be trying to boot from the old drive, or the cloning process may not have copied the required boot partition.
If you performed a clean installation, confirm that the Windows USB drive was removed or that the SSD is selected as the boot device.
The SSD runs hot
NVMe drives can become warm during large transfers. Improve airflow, install the motherboard heatsink if available, and keep cables clear of the intake fans.
High temperatures can reduce performance for a short time. This is called thermal throttling. It protects the drive from excessive heat, but repeated high temperatures should be investigated.
The SSD seems slower than expected
Check whether you installed a SATA SSD in a SATA-limited connection or an NVMe SSD in a slower PCIe slot. Also remember that small file tasks may not match the large sequential speeds shown on the product page.

Tips for Better SSD Performance and Lifespan
Modern SSDs are reliable, but sensible maintenance still matters.
• Keep at least 10% to 20% of the drive free when possible.
• Enable TRIM, which Windows normally manages automatically.
• Install motherboard chipset and storage drivers from trusted sources.
• Keep firmware updated when the manufacturer recommends it.
• Do not defragment an SSD like a hard drive.
• Keep important data backed up in more than one place.
• Use a surge protector or an uninterruptible power supply for a desktop PC.
TRIM helps the operating system tell the SSD which blocks are no longer in use. This supports efficient data management. Windows usually enables it automatically, so most users do not need to adjust advanced settings.
An SSD is not a backup. It can fail without warning, just like any other storage device. For valuable files, use an external backup or a trusted cloud service.
From practical upgrades, the most common avoidable mistake is skipping the backup. The installation may take only a few minutes, but recovering lost family photos or work files can take far longer.
Frequently Asked Questions About How to Install a SSD in PC
Do I need to reinstall Windows after installing an SSD?
No. You can use the SSD as a secondary storage drive without reinstalling Windows. If you want the SSD to be the main boot drive, you can clone your current installation or perform a clean installation.
Can I install an NVMe SSD in any PC?
No. The motherboard must have a compatible M.2 slot that supports NVMe. Check the motherboard manual because some M.2 slots support only SATA drives or may share bandwidth with other ports.
Should I use GPT or MBR for a new SSD?
GPT is usually the correct choice for a modern PC using UEFI firmware. MBR is mainly useful for older systems with legacy BIOS support.
Why is my new SSD not showing in File Explorer?
The SSD may not have a partition or drive letter. Open Disk Management, initialize the drive if needed, and create a new simple volume.
Can I use both an SSD and a hard drive in the same PC?
Yes. Many PCs use an SSD for Windows and apps, then use a hard drive for large files, backups, or less frequently used games.
Is a SATA SSD better than an NVMe SSD?
NVMe SSDs are usually faster, but SATA SSDs are often cheaper and compatible with more computers. For normal office work and web browsing, both can feel much faster than a hard drive.
Do I need an SSD heatsink?
Not always. Basic use usually does not require one, but a heatsink can help an NVMe drive maintain speed during long transfers and heavy workloads.
Conclusion
Installing an SSD can transform a slow PC into a much more responsive machine. The key steps are choosing a compatible drive, backing up your data, connecting the SSD correctly, setting it up in Windows, and selecting the right boot device if you move the operating system.
Whether you choose a 2.5-inch SATA model or an M.2 NVMe drive, take your time and never force a connector. Use this guide to install a SSD in PC with confidence, then check your motherboard manual for model-specific details. If this guide helped, explore more PC upgrade resources or share your installation experience in the comments.
