

To install a second SSD, check compatibility, mount the drive, connect it, initialize it, and format it.
Learning how to install second SSD storage is easier than it sounds. The key is knowing whether your computer supports a 2.5-inch SATA SSD, an M.2 NVMe SSD, or both. This guide explains the full process, from checking your hardware to setting up the new drive in Windows, with practical tips that help you avoid common upgrade mistakes.

Before You Install a Second SSD
A second SSD can give your computer more room for games, photos, videos, apps, and work files. It can also reduce clutter on your main system drive. However, the installation process depends on your computer case, motherboard, laptop design, and available ports.
Before you learn how to install second SSD storage, identify the type of drive you bought. Most modern computers use one of these two formats:
• 2.5-inch SATA SSD: This flat drive uses a SATA data cable and a SATA power cable.
• M.2 SATA SSD: This small stick-shaped drive fits into an M.2 slot but uses the slower SATA interface.
• M.2 NVMe SSD: This compact drive also fits into an M.2 slot, but it uses PCIe lanes for much faster speeds.
Check your motherboard or laptop manual before opening the device. It will show which M.2 slots are available and whether they support SATA, NVMe, or both. An M.2 slot is not automatically compatible with every M.2 SSD.
What You Need
Gather these items before you begin:
• The new SSD
• A small Phillips screwdriver
• A SATA data cable, if you are installing a 2.5-inch SATA SSD
• An available SATA power connector from the power supply
• An M.2 screw and standoff, if you are installing an M.2 SSD
• A clean, well-lit work area
• Your computer manual or motherboard layout
If you are upgrading a desktop, shut down the computer and unplug the power cable. For a laptop, turn it off fully and disconnect the charger. If the battery is removable, remove it as well.

Check Whether Your Computer Supports a Second SSD
The first step in learning how to install second SSD hardware is checking whether your computer has a free connection or slot. Desktop PCs usually offer more upgrade options than laptops, but space can still be limited.
Check a Desktop Computer
Open your desktop case and look for one of these options:
• An unused M.2 slot on the motherboard
• An empty 2.5-inch drive bay
• A free SATA port on the motherboard
• An unused SATA power connector from the power supply
A 2.5-inch SATA SSD needs both data and power. The SATA data cable connects the SSD to the motherboard. The SATA power cable connects the SSD to the power supply.
An M.2 SSD needs much less. It slides into an M.2 slot and is held down with a small screw. It does not need a separate data or power cable.
Some motherboards disable certain SATA ports when specific M.2 slots are in use. This is common because several connectors may share the same chipset lanes. Your motherboard manual will identify any shared ports.
Check a Laptop Computer
Laptop upgrades require more care. Some laptops have one M.2 slot and no room for a second drive. Others include a second M.2 slot or a 2.5-inch drive bay.
Look for the following information in the laptop manual:
• Whether the RAM or storage can be upgraded
• The supported SSD size and interface
• Whether a second drive bay exists
• Whether a mounting bracket or cable is required
• Whether opening the device affects warranty coverage
Thin laptops often have storage soldered to the motherboard. In that case, you may not be able to install a second internal SSD. A USB SSD enclosure is a useful alternative.
Choose Between SATA and NVMe SSDs
Choosing the right SSD makes the installation smoother. It also helps you avoid buying a drive your computer cannot use.
SATA SSDs are widely compatible and usually cost less. Their real-world speed is far higher than a hard disk drive, but they are limited by the SATA interface. A typical SATA SSD can reach around 500 to 550 MB/s in sequential transfers.
NVMe SSDs use PCIe technology. They can deliver much higher speeds, especially during large file transfers and demanding workloads. Newer PCIe 4.0 and PCIe 5.0 drives can be very fast, but the computer must support the same interface to reach its rated performance.
A newer NVMe SSD can work in some older M.2 slots at a lower speed. However, an M.2 SATA drive will not work in an M.2 slot that supports NVMe only. Always confirm compatibility before buying.
Which SSD Type Is Best?
Choose a 2.5-inch SATA SSD if:
• Your computer has free SATA ports and drive space
• You want a simple and affordable upgrade
• You are replacing or adding storage to an older desktop
Choose an M.2 NVMe SSD if:
• Your motherboard or laptop has a compatible NVMe slot
• You move large files often
• You want a clean installation without extra cables
• You are building a modern gaming or work computer
For game storage, either type works well. Game loading times depend on many factors, including the game engine, CPU, and file design. NVMe is faster in benchmarks, but the difference may be modest during everyday gaming.
How to Install a Second SSD in a Desktop PC
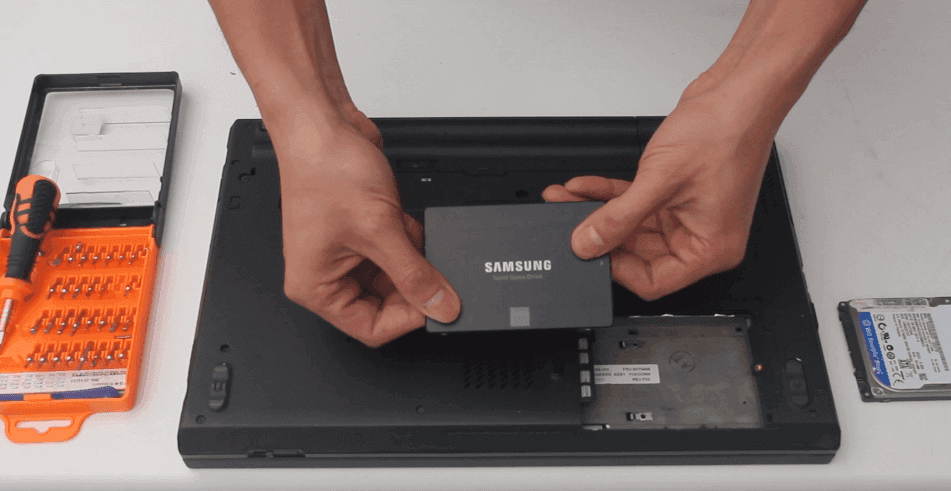
The physical installation is usually straightforward. Take your time, avoid force, and keep screws in a safe place.
Install a 2.5-Inch SATA SSD
Follow these steps:
Shut down the computer and unplug every cable.
Press the power button for a few seconds to discharge leftover power.
Remove the side panel from the computer case.
Find an empty 2.5-inch drive mount or adapter bracket.
Secure the SSD with the correct screws.
Connect one end of the SATA data cable to the SSD.
Connect the other end of the SATA data cable to an open SATA port on the motherboard.
Connect a SATA power plug from the power supply to the SSD.
Check that both connections are fully inserted.
Reinstall the side panel and reconnect the cables.
SATA connectors are shaped to fit only one way. Never force them. If a cable feels difficult to insert, check the alignment first.
Place the SSD where it has some airflow. SSDs produce less heat than hard drives, but extreme heat can reduce sustained performance. Avoid leaving the drive loose inside the case.
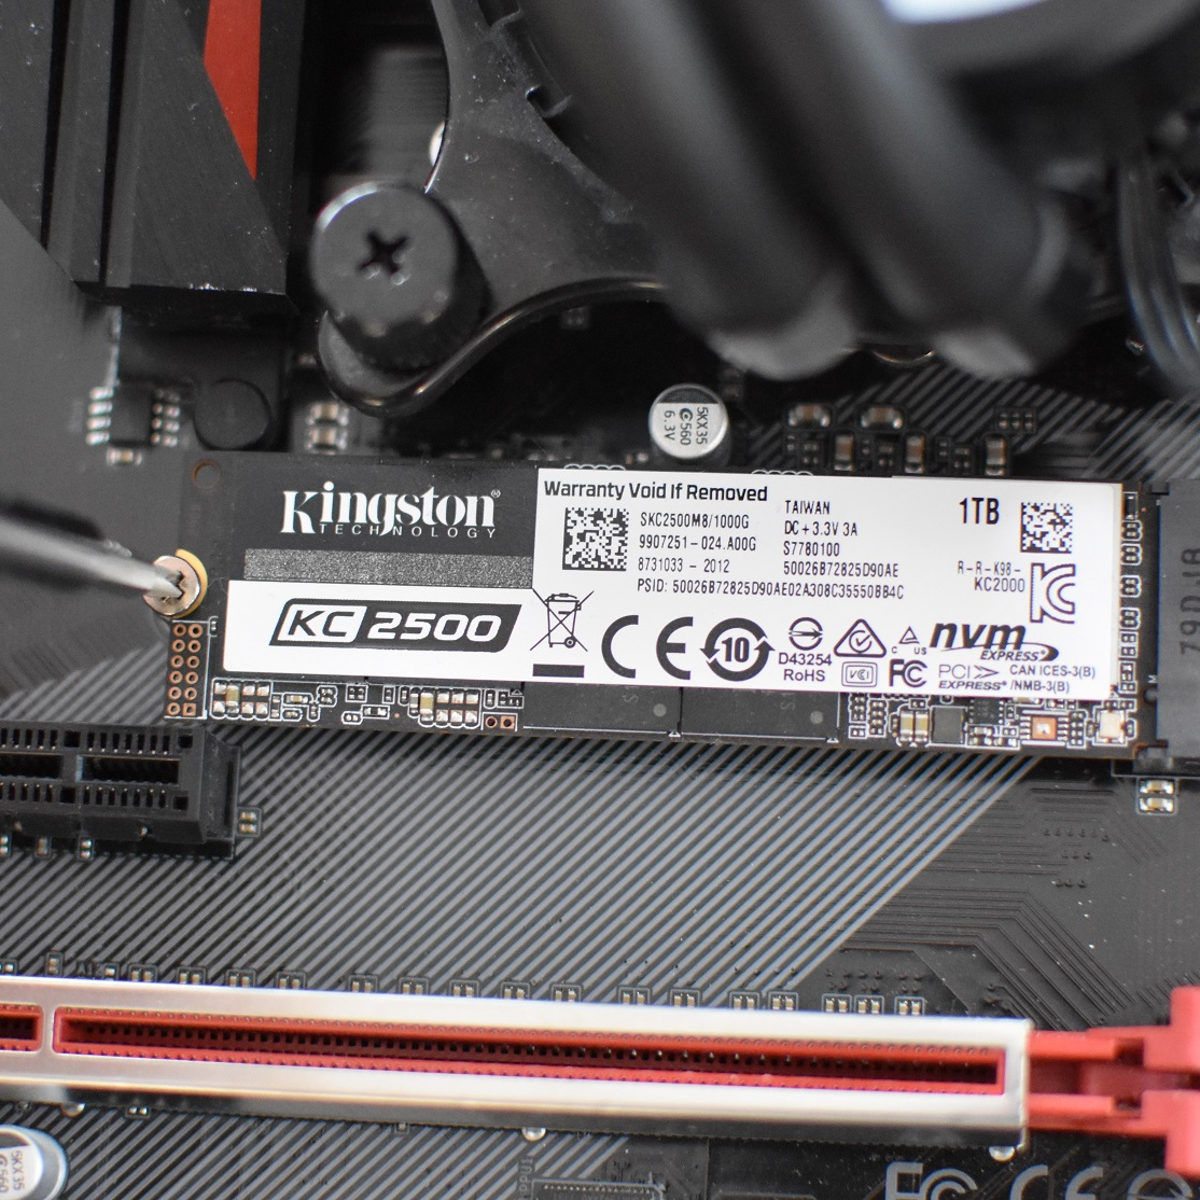
Install an M.2 NVMe SSD
Use these steps for an M.2 drive:
Turn off and unplug the computer.
Remove the side panel.
Locate the correct M.2 slot on the motherboard.
Remove the small M.2 screw if it is already installed.
Check the standoff position for the length of your SSD.
Hold the SSD by its edges.
Insert the drive into the slot at about a 30-degree angle.
Press the free end down gently.
Secure the SSD with the M.2 screw.
Replace any motherboard heatsink that covers the slot.
Do not touch the gold contacts on the drive. The notch on the SSD must match the key inside the slot. If the drive does not slide in easily, remove it and check the orientation.
A common mistake is forgetting the M.2 standoff. Without it, the SSD may bend when you tighten the screw. Another mistake is leaving a plastic film on a thermal pad beneath the heatsink. Remove the film before fitting the heatsink.

How to Install a Second SSD in a Laptop
Laptop installation varies widely, so the exact steps depend on the model. Some laptops use a bottom cover with several screws. Others require removing rubber feet or a keyboard panel.
Before opening the laptop, back up important files. Then follow these general steps:
Shut down the laptop completely.
Unplug the charger and all accessories.
Hold the power button for several seconds.
Remove the bottom cover using the correct screwdriver.
Disconnect the internal battery if the design allows it.
Find the empty M.2 slot or 2.5-inch drive bay.
Install the SSD without touching its contacts.
Secure the drive with the supplied screw or bracket.
Connect any required storage cable.
Reconnect the battery and replace the bottom cover.
Some laptops need a special SATA cable or mounting bracket. These parts may not be included with the laptop or SSD. If the drive bay is empty but no cable is present, search for the exact part number for your laptop model.
Do not bend the bottom cover or pry near ports. Plastic clips can break easily. A thin plastic opening tool is safer than a metal knife.
If your laptop has only one internal drive slot, you cannot install a second internal SSD without replacing the original drive. In that situation, an external USB-C SSD is often the simplest option.

Set Up the New SSD in Windows
After the physical installation, Windows may not show the drive in File Explorer right away. This does not always mean something went wrong. A new SSD often needs to be initialized and formatted first.
Here is how to install second SSD storage from the Windows software side:
Start the computer.
Right-click the Start button.
Select Disk Management.
Find the new drive in the lower section of the window.
If Windows asks to initialize the disk, choose GPT.
Right-click the unallocated space.
Select New Simple Volume.
Follow the setup wizard.
Assign a drive letter.
Format the volume with NTFS.
Give the drive a clear name, such as Games or Projects.
GPT is the best choice for most modern systems. It supports large drives and works well with current versions of Windows. MBR is mainly useful for older systems that require legacy compatibility.
Formatting erases data on the selected partition. A brand-new SSD should be empty, but always confirm the correct disk before formatting. Selecting the wrong disk can destroy your files.
After setup, open File Explorer and confirm that the new drive appears. You can then copy files to it or install applications there.
How to Use the Second SSD for Games and Apps
A second SSD is useful for more than storing documents. You can move large games, creative projects, virtual machines, and media libraries to it.
For Steam, open the storage settings and create a new library folder on the second SSD. Other launchers have similar storage options. You can also choose the new drive during an application's installation.
Keep Windows and essential programs on the fastest or most reliable drive when possible. Use the second SSD for:
• Games
• Video files
• Photo libraries
• Music projects
• Download folders
• Virtual machines
• Scratch files
• Backups of important data
Do not treat a second SSD as a complete backup by itself. If the computer is stolen, damaged, or affected by malware, both internal drives may be lost. Keep another copy on an external drive or trusted cloud storage.
A good backup plan follows the simple three-copy rule: keep the original file and at least two additional copies, with one copy stored in a different location.
Check BIOS and Windows if the SSD Is Not Detected
If the new SSD does not appear, stay calm. Most detection problems come from a loose cable, an incompatible slot, or missing Windows setup.
Work through these checks:
• Turn off the PC and reseat the SSD.
• Check both SATA data and SATA power cables.
• Try another SATA port on the motherboard.
• Confirm that the M.2 slot supports your SSD type.
• Check whether another M.2 slot disables a SATA port.
• Open Disk Management and look for an unallocated disk.
• Check Device Manager under Disk drives.
• Enter the BIOS or UEFI and look for the drive.
• Update the motherboard firmware only when necessary.
If the drive appears in BIOS but not File Explorer, it probably needs initialization or formatting. If it appears in Disk Management but has no drive letter, assign one through the volume settings.
If the SSD does not appear in BIOS, Windows cannot use it yet. Focus on physical connections, slot compatibility, firmware settings, and possible hardware failure.
For laptops, a missing drive may also result from a disabled storage slot or a required mounting cable. The service manual usually provides the most accurate answer.
Common Mistakes to Avoid
Knowing how to install second SSD storage is only part of the job. Avoiding mistakes protects your hardware and data.
Installing the Wrong M.2 Drive
M.2 describes the shape of the drive, not its communication method. An M.2 SATA SSD and an M.2 NVMe SSD can look almost identical while using different interfaces.
Forgetting the Power Cable
A 2.5-inch SATA SSD needs a SATA power connection. The data cable alone cannot power it.
Using the Wrong SATA Port
Some motherboard ports may be disabled when an M.2 drive is installed. Check the manual before assuming the port or SSD is defective.
Touching the Contacts
Hold the drive by its edges. Oils and debris from your fingers can affect the contacts over time.
Over-Tightening Screws
M.2 screws are small and do not need much force. Tighten them until the drive is secure, then stop.
Skipping Backups
A storage upgrade is a good time to review your backup plan. Keep important files safe before opening the computer or moving data.
Cloning Without Checking Disk Size
If you plan to clone Windows to the new SSD, the target drive must have enough usable space for the source data. A smaller drive may work only if the existing partitions are reduced first.
Should You Clone Windows to the Second SSD?
You do not need to clone Windows if you want to use the new SSD as extra storage. Simply initialize it and create a new volume in Disk Management.
Cloning makes sense when you want the new SSD to become the main system drive. It copies Windows, applications, settings, and files to the new drive. After cloning, you must change the boot order in BIOS or remove the old drive temporarily to test the new one.
Before cloning:
• Back up personal files.
• Check the used space on the current system drive.
• Confirm that the new SSD has enough capacity.
• Use cloning software that supports your partition style.
• Disconnect unnecessary external drives during the process.
• Verify that the cloned drive boots before erasing the old drive.
One lesson that saves time is to keep the original drive untouched until the new installation works. If the clone fails, the old drive gives you a safe way back.
How to Maintain a Second SSD
SSDs do not need defragmentation in the same way hard drives do. Windows usually manages SSD optimization automatically through scheduled maintenance.
For good long-term performance:
• Keep at least 10% to 20% of the drive free.
• Install important firmware updates when they solve a known issue.
• Avoid repeated full-drive benchmarking.
• Keep the computer cool and dust-free.
• Monitor drive health with a reliable storage utility.
• Maintain current backups.
Modern SSDs use flash memory with a limited write life. For normal home, office, and gaming use, this is rarely a concern. Heavy workloads, such as constant video recording or database writing, create more wear.
Drive health tools may show total bytes written and estimated remaining life. These figures are useful, but they are not perfect predictions. A drive can fail before its estimated limit, so health monitoring never replaces backups.
Frequently Asked Questions About How to Install Second SSD
Can I install a second SSD in any computer?
No. The computer needs a free compatible M.2 slot or an available SATA connection and mounting location. Check the motherboard or laptop manual before buying the drive.
Does a second SSD make my computer faster?
A second SSD gives you more storage and can improve loading times compared with a hard drive. It may not make Windows faster unless you install or move Windows and frequently used applications to that drive.
Do I need to format a new SSD?
Usually, yes. Windows may require you to initialize the drive, create a volume, and format it before File Explorer can use it. Formatting removes existing data, so select the correct disk.
Can I use an NVMe SSD in a SATA M.2 slot?
No, not normally. An M.2 SATA slot and an M.2 NVMe slot use different interfaces, even though the drives have a similar shape. Confirm the slot specification before installation.
Can I install a second SSD without reinstalling Windows?
Yes. If you are using the SSD for extra storage, you do not need to reinstall Windows. Initialize and format the drive in Disk Management after connecting it.
Why is my second SSD not showing in File Explorer?
The SSD may be uninitialized, unformatted, or missing a drive letter. Check Disk Management first, then inspect the physical connection and BIOS detection if the drive is not listed there.
Is a heatsink required for a second NVMe SSD?
A heatsink is not always required for normal use. It can help an NVMe SSD maintain speed during long transfers, especially in a warm case or under heavy workloads.
Conclusion
Installing a second SSD involves three main tasks: confirm compatibility, fit the drive correctly, and prepare it in Windows. A 2.5-inch SATA SSD needs data and power cables, while an M.2 SSD fits directly into a compatible motherboard or laptop slot.
Take a few minutes to check the manual, back up important files, and avoid forcing any connector. Once the drive appears in Disk Management, initialize it with GPT, create a volume, and format it for use. Follow these steps carefully, and you can expand your storage with confidence. Explore your computer’s upgrade options today, and share your installation experience or questions in the comments.