

Test a new SSD with SMART checks, a full surface scan, and a verified read/write test before storing important files.
A new solid-state drive should work perfectly, but shipping damage, firmware bugs, fake capacity, or early hardware faults can still occur. Learning how to test new SSD for bad sectors helps you catch problems while the drive is still covered by its return or warranty period. This guide explains safe methods for Windows, macOS, and Linux, plus how to read SMART data and decide what to do if errors appear.
What “bad sectors” mean on an SSD
A bad sector is a storage area that cannot reliably hold or return data. The term comes from hard disk drives, where physical sectors can fail because of damaged magnetic surfaces. SSDs use NAND flash memory, so the more accurate terms are bad blocks, uncorrectable errors, or failing memory cells.
Modern SSDs hide many flash problems from the operating system. The controller maps out weak blocks and replaces them with spare blocks. This process is normal when it happens in small amounts. It becomes a concern when the drive reports uncorrectable errors, rising bad block counts, or failed data transfers.
Testing a new SSD does not mean looking for zero wear. A new drive may already show a small amount of host-written data from factory testing. What matters is whether the drive reports errors, passes a full test, and matches its advertised capacity.

Prepare before testing a new SSD
Testing can be simple, but preparation matters. Some surface tests write data across the entire drive. These tests erase existing files, so never run them on a drive that contains data you need.
Before you begin, follow these steps:
- Install the SSD correctly and check that the computer detects its full capacity.
- Update the motherboard or storage controller firmware if needed.
- Install the SSD manufacturer’s management tool.
- Back up any data on the drive.
- Connect the SSD directly to the computer when possible.
- Avoid cheap USB adapters during the first test.
- Make sure the drive has good airflow.
- Record the model number, serial number, firmware version, and advertised capacity.
A USB enclosure can limit testing. Some adapters do not pass SMART data to the operating system. Others disconnect when a long write test causes heat or power spikes. For the most reliable result, connect a SATA SSD to a motherboard SATA port or install an NVMe SSD in a supported M.2 slot.
A useful lesson from real storage testing is to test one variable at a time. If an SSD fails through a USB adapter, the adapter or cable may be the real problem. Repeat the test with a direct connection before requesting a replacement.

Check SSD health with SMART data
SMART, or Self-Monitoring, Analysis and Reporting Technology, lets a drive report its internal health information. It can show the drive temperature, total data written, unsafe shutdowns, spare capacity, media errors, and other details.
SMART is an important part of how to test new SSD for bad sectors, but it is not a complete surface test. A drive can pass a basic SMART status check and still have a bad cable, damaged file system, or intermittent read problem.
Look for these values:
• Overall health: This should report “Good,” “Passed,” or a similar status.
• Critical warning: This should normally be zero on an NVMe SSD.
• Media and data integrity errors: These should normally remain at zero.
• Uncorrectable errors: Any nonzero value deserves attention.
• Percentage used: A new SSD should show little or no wear.
• Available spare: This should not show a critical reduction.
• Unsafe shutdowns: A few may appear after power loss, but the number should not rise during normal use.
• Temperature: Check the manufacturer’s recommended range. Excessive heat can cause slowdowns and test failures.
SMART attribute names vary by brand. Do not judge one value without checking the drive maker’s documentation. Some vendors use raw numbers in ways that are not directly comparable between models.
On Windows, tools such as CrystalDiskInfo and the manufacturer’s utility can display SMART data. On Linux, the smartctl command can read many SATA and NVMe devices. macOS users may need a third-party utility because built-in tools provide limited SMART detail.

How to test a new SSD for bad sectors in Windows
Windows provides several useful checks. Use them in order, starting with non-destructive tests.
1. Check the drive in Disk Management
Press Windows + X, then select Disk Management. Confirm that the SSD has the correct approximate capacity and the expected partition layout.
Manufacturers list capacity in decimal units, while Windows often displays capacity in binary units. For example, a drive sold as 1 TB may appear as roughly 931 GB in Windows. That difference is normal and does not indicate missing space.
If the drive shows a much smaller capacity, an incorrect model, or unallocated space that you did not expect, stop and investigate before testing further.
2. Run a file system check
Open Command Prompt as an administrator and run:
chkdsk X: /scan
Replace X: with the correct drive letter. This command checks the file system while Windows is running and does not perform a full destructive surface test.
For a deeper check, you can use:
chkdsk X: /r
The /r option checks for unreadable areas and attempts to recover readable data. On SSDs, it can create heavy drive activity and is not usually the first test for a brand-new drive. Do not use it casually on a drive with important files.
3. Check the physical disk status
Open PowerShell as an administrator and run:
Get-PhysicalDisk | Format-Table FriendlyName, MediaType, HealthStatus, OperationalStatus, Size
A healthy drive should normally show Healthy for HealthStatus and OK for OperationalStatus.
You can also run:
Get-Disk | Format-Table Number, FriendlyName, HealthStatus, OperationalStatus, Size
These commands provide a useful overview, but they do not replace SMART data or a full read/write test.
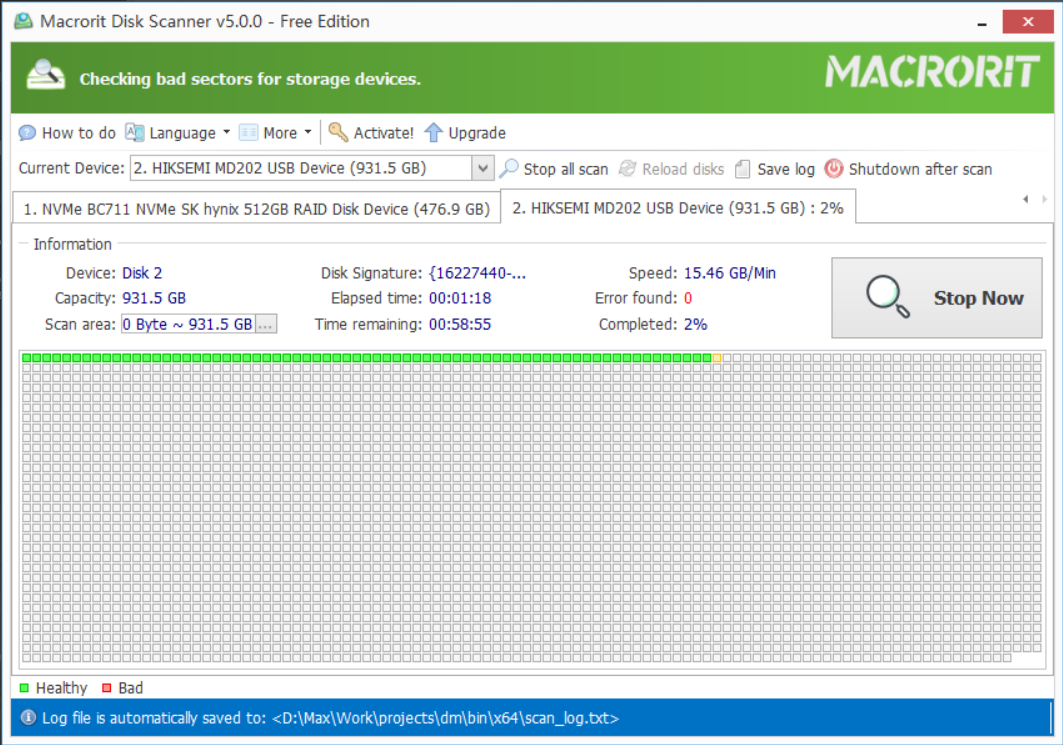
4. Run a non-destructive surface scan
A reputable disk-testing tool can read every addressable area and report slow or failed reads. Choose a read-only or verify-only mode first. This is the safest approach when the drive already contains data.
A full read scan can take several hours. A 4 TB SSD may need much longer than a 500 GB model. Do not interrupt the scan unless the computer becomes unstable or the drive temperature becomes unsafe.
5. Run a verified write test on an empty SSD
For a completely empty SSD, a full write and read-back test provides stronger evidence. The tool writes test patterns, reads them back, and compares the results.
This test can:
• Erase the entire drive
• Add a large amount of written data
• Increase the drive temperature
• Trigger the SSD’s normal garbage collection
• Reveal fake capacity or unstable flash memory
Use the manufacturer’s diagnostic utility when available. If the test reports a failed block, data mismatch, or uncorrectable error on a new drive, save the test report and avoid using the SSD for important files.
How to test an SSD on macOS
macOS includes basic disk tools, but its built-in features do not expose every SSD health detail.
Start with Disk Utility:
- Open Applications.
- Select Utilities.
- Open Disk Utility.
- Choose View, then Show All Devices.
- Select the physical SSD.
- Click First Aid.
First Aid checks and repairs the partition structure and file system. It does not scan every NAND cell for bad blocks. A successful First Aid result means the file system is consistent, not that every part of the SSD has passed a hardware test.
For deeper testing, use the SSD manufacturer’s macOS utility when supported. You can also use a SMART utility that supports the drive interface. For a new SSD, look for a full read scan, not only a quick health summary.
If the drive is empty, erase it first using Disk Utility and then run a trusted full write/read test. Be extremely careful to select the correct physical disk. A mistaken selection can erase your internal system drive.

How to test an SSD on Linux
Linux provides powerful tools for SSD testing. The correct device name is essential, so identify it before running any command.
Use this command to list drives:
lsblk -o NAME,SIZE,MODEL,SERIAL,TYPE,MOUNTPOINTS
For a SATA SSD, SMART data may be available with:
sudo smartctl -a /dev/sdX
For an NVMe SSD, use:
sudo smartctl -a /dev/nvme0
Replace the device path with the correct one. You may need to install the smartmontools package first.
An NVMe self-test can often be started with:
sudo nvme device-self-test /dev/nvme0 --self-test-code=1
The exact command can vary by utility version. Read the result with:
sudo nvme device-self-test-log /dev/nvme0
The badblocks command requires caution. A read-only scan is less risky:
sudo badblocks -sv /dev/sdX
Do not run a destructive write-mode command on a drive that contains data. A write test replaces existing content and can also add unnecessary wear to the SSD.
For advanced users, fio can perform controlled write, read, and verification tests. Always use a test file on the correct mounted volume or a clearly identified empty device. A small mistake in the target path can destroy an operating system or backup.

Use the manufacturer’s SSD diagnostic tool
The SSD maker’s utility is often the best first choice because it understands the drive’s firmware and SMART attributes. It may provide:
• Firmware updates
• Health status
• Temperature readings
• Total bytes written
• Secure erase tools
• Short and extended diagnostics
• Overprovisioning settings
• Performance tests
A firmware update can fix compatibility problems, but do not update firmware during a storm, unstable power condition, or unreliable connection. A failed firmware update can make the drive unusable.
Performance tests are useful, but speed alone does not prove that an SSD is healthy. A drive may reach its advertised sequential speed and still fail random reads or data verification. Treat benchmarks as secondary evidence after health and surface checks.

How to read the test results
A good new SSD should pass several checks together:
• The computer detects the correct model and capacity.
• SMART reports a healthy status.
• Critical warnings and uncorrectable errors remain at zero.
• A read scan completes without failed sectors or data errors.
• A verified write test completes without mismatches.
• The drive maintains a stable connection.
• Temperature stays within a safe range.
One slow area does not always mean a bad SSD. Thermal throttling, background updates, antivirus scans, and a busy operating system can reduce speed. Read errors, repeated disconnects, corrupted files, and verification mismatches are much more serious.
A surface scan may report logical file system errors rather than physical flash damage. Run a file system check and repeat the hardware test. If the same location fails again, treat the result as a hardware concern.
Remember that a test cannot prove an SSD will never fail. It only shows that the drive passed under the conditions tested. NAND cells can degrade later, controllers can fail suddenly, and power problems can damage data even when SMART looks normal.
What to do if a new SSD reports errors
Stop using the drive for important files if it reports uncorrectable errors, repeated read failures, or data mismatches. Do not keep rerunning destructive tests in the hope that the result will change.
Save evidence such as:
• Screenshots of SMART data
• The diagnostic test report
• The SSD model and serial number
• The purchase receipt
• Error messages and dates
Test the SSD in another compatible computer if possible. Replace the cable, USB enclosure, or power connection when testing a SATA model. For an NVMe drive, check that the module is seated correctly and that the M.2 slot supports the drive type.
If the problem follows the SSD, request a replacement or refund. A brand-new drive should not need to be “watched” after reporting uncorrectable errors. It is safer to exchange it while the return window is open.
A drive that passes every test but disconnects during everyday use may still be defective. Reliability includes stable operation during sleep, restart, file copies, and normal workloads.
Mistakes to avoid when testing an SSD
Many testing problems come from the test setup rather than the SSD. Avoid these common mistakes:
• Running a destructive scan on the wrong disk.
• Testing through a poor USB adapter and blaming the SSD.
• Ignoring SMART because a benchmark shows high speed.
• Treating a quick format as a complete health test.
• Confusing decimal and binary capacity measurements.
• Testing while the SSD is overheating.
• Interrupting a firmware update.
• Using an old diagnostic tool that does not support the drive.
• Repeating full write tests many times on a drive that already failed.
• Storing important data on a drive before completing the checks.
The safest process is gradual. Start with identification and SMART data. Continue with a read-only scan. Finish with a full verified write test only when the SSD is empty and you have confirmed the correct target.
Frequently Asked Questions About How to Test a New SSD for Bad Sectors
Can a new SSD have bad sectors?
A new SSD can contain weak NAND blocks, but its controller should normally detect and replace them before they affect user data. Uncorrectable errors, failed verification, or repeated disconnects on a new drive are strong reasons to request a replacement.
What is the best way to test a new SSD for bad sectors?
Use three checks: read SMART data, run a full read scan, and perform a verified write/read test on an empty drive. This combination checks health information, readable areas, and real data integrity.
Does CHKDSK find bad sectors on an SSD?
CHKDSK mainly checks the file system and can identify unreadable areas exposed to Windows. It is useful for file system problems, but it is not a complete SSD hardware diagnostic.
How long does an SSD bad sector test take?
The time depends on capacity, connection speed, and the selected test. A full scan may take less than an hour on a small SSD and several hours on a large drive.
Should I return an SSD with one bad sector?
Return a new SSD if a reliable diagnostic tool reports an uncorrectable error, failed verification, or repeated read failure. Do not rely on a single vague warning from an unsupported USB adapter without testing the drive through a direct connection.
Can a SMART “Good” result guarantee that an SSD is healthy?
No. SMART is valuable but not perfect. A drive can pass SMART and still have connection problems, corrupted data, firmware issues, or faults that the drive has not yet recorded.
Conclusion
Learning how to test a new SSD for bad sectors is a practical way to protect your files and avoid future trouble. Check the model and capacity, review SMART data, run a read-only scan, and use a verified write test only on an empty drive. Test through a reliable connection, watch the temperature, and keep evidence if the SSD reports errors.
A new SSD should pass these checks without drama. If it does not, use the return or warranty process instead of taking a risk with valuable data. Apply this testing routine to every new drive, and explore your manufacturer’s diagnostic tools for model-specific guidance.