

Use CrystalDiskMark, Windows tools, or Task Manager to measure NVMe SSD read and write speeds in Windows 11.
Learning how to check NVMe SSD speed in Windows 11 helps you confirm that your drive works as expected. It can also reveal limits caused by a slow PCIe slot, poor cooling, outdated drivers, or the wrong test settings. This guide explains safe testing methods, how to read the results, and what speeds you should expect from different NVMe generations.
Why Check Your NVMe SSD Speed?
An NVMe SSD can make Windows 11 start quickly, open apps faster, and reduce game loading times. However, the speed printed on the box is a best-case result from controlled testing. Your real speed may be lower because of your motherboard, PCIe connection, drive temperature, free space, or workload.
Knowing how to check NVMe SSD speed in Windows 11 is useful in several situations:
• You installed a new SSD and want to confirm it is working correctly.
• Your computer feels slower than expected.
• You are comparing an old SSD with a new PCIe 4.0 or PCIe 5.0 model.
• You want to check whether a laptop is using the correct PCIe mode.
• You suspect thermal throttling or a failing drive.
SSD speed has two main parts:
• Sequential speed measures large, continuous files. It matters when moving videos, disk images, and other large files.
• Random speed measures many small file operations. It affects Windows startup, app launches, updates, and general system response.
A drive may show excellent sequential speed but only average everyday performance. Think of sequential speed as the width of a highway. Random speed is closer to how well that highway handles many small cars at once.

Check NVMe SSD Speed with CrystalDiskMark
CrystalDiskMark is one of the simplest ways to check NVMe SSD speed in Windows 11. It shows sequential and random read and write results in an easy table. Many hardware reviewers use it because the results are easy to compare.
Download the current version from a trusted official source. Avoid random download sites, as they may bundle unwanted software.
Prepare Windows 11 for the test
Before you start, take a few simple steps:
Close games, browsers with many tabs, cloud sync tools, and large downloads.
Connect your laptop to AC power.
Let the system sit for a few minutes so the SSD reaches a normal idle temperature.
Keep at least 10% to 20% free space on the drive.
Do not run the test while Windows is installing an update.
Back up important files before using any disk benchmark.
CrystalDiskMark writes test data to the selected drive. It is designed for this purpose, but every write adds some wear. Running a few tests is normally fine, but repeated testing is not useful.
Run the benchmark
Open CrystalDiskMark and choose the following settings:
• Test count: 3 or 5
• Test size: 1 GiB for a quick check or 8 GiB for a steadier result
• Target drive: Your NVMe SSD
• Test profile: Default settings
Click All to run the full test. The process may take several minutes.
The result table commonly includes these tests:
• SEQ1M Q8T1: Large sequential transfers with eight queued tasks and one thread.
• SEQ1M Q1T1: Large sequential transfers with one queued task and one thread. This often gives a more realistic file copy result.
• RND4K Q32T16: Small random transfers with a deep queue and multiple threads.
• RND4K Q1T1: Small random transfers with a low queue and one thread. This is closer to many everyday desktop tasks.
Read speed is shown in MB/s, while random performance may also appear in IOPS. Higher numbers are generally better, but compare similar tests only.
How to read CrystalDiskMark results
A PCIe 3.0 NVMe SSD often reaches about 2,000 to 3,500 MB/s for sequential reads. PCIe 4.0 models may reach about 5,000 to 7,500 MB/s. High-end PCIe 5.0 drives can exceed 10,000 MB/s under the right conditions.
These figures are broad ranges, not guarantees. The SSD controller, NAND type, firmware, motherboard slot, and test size all affect the result.
A useful lesson from real-world testing is that one low result does not always mean a bad drive. Run the benchmark two or three times. If the results are close, the measurement is likely stable. If the score drops sharply after the first run, heat or a full SLC cache may be affecting the drive.
.jpg)
Check NVMe SSD Speed with Windows 11 Tools
You can check some SSD performance details without installing a benchmark app. Windows 11 includes Task Manager, PowerShell, and the Windows System Assessment Tool. These tools are useful, but they do not provide the same level of detail as CrystalDiskMark.
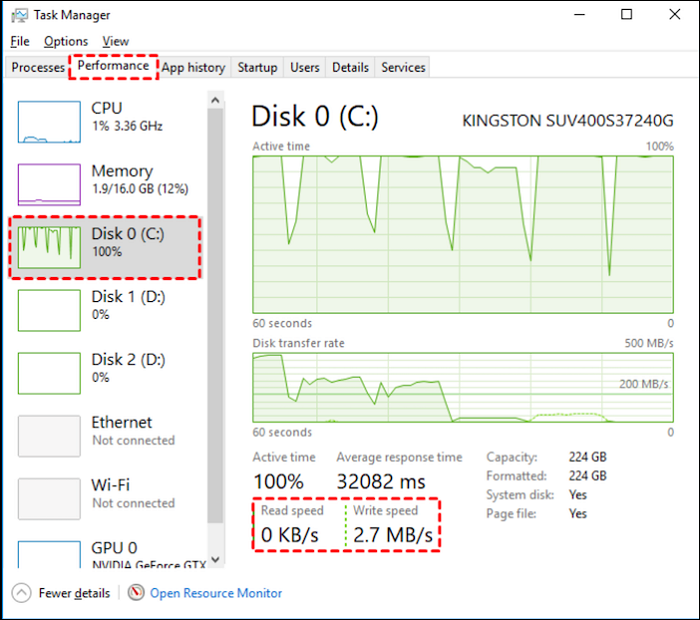
Use Task Manager
Task Manager shows live disk activity and transfer speed.
Press Ctrl + Shift + Esc.
Select Performance.
Choose the disk that contains your NVMe SSD.
Watch the Read speed and Write speed values.
To create activity, copy a large file to or from the drive. You can also open an application or install a trusted game. Task Manager will show the speed used at that moment.
This method is easy, but it is not a complete benchmark. The result depends on the file, source drive, background tasks, and cache. A slow source drive can make a fast NVMe SSD look slow.
Use the Windows System Assessment Tool
The WinSAT command can provide a quick storage test.
Right-click the Start button.
Select Terminal (Admin) or Windows PowerShell (Admin).
Approve the User Account Control prompt.
Enter this command:
winsat disk -drive c
Replace c with the correct drive letter if your Windows installation uses another letter.
The command may report disk scores and transfer rates. You can also run:
winsat disk -drive c -seq -read
For a sequential write test, use:
winsat disk -drive c -seq -write
WinSAT is convenient, but it is not as detailed or consistent as a dedicated benchmark. Use it for a quick health check rather than a full performance review.
Use PowerShell to identify the drive
PowerShell can help confirm that Windows sees the drive as an NVMe device.
Open Terminal or PowerShell and run:
Get-PhysicalDisk | Format-Table FriendlyName, MediaType, BusType, Size
Look for:
• MediaType: SSD
• BusType: NVMe
• The correct drive capacity
This command does not measure speed by itself. It confirms the connection type and helps prevent testing the wrong disk.

Check NVMe SSD Speed in Task Manager Without Extra Software
Many people searching for how to check NVMe SSD speed in Windows 11 want a fast answer with no downloads. Task Manager is the easiest built-in option, but it measures current activity rather than maximum capability.
For a better manual test, copy a large file between two fast drives. A single 20 GB video file works better than thousands of tiny files. Watch the transfer rate in the Windows copy window or Task Manager.
Keep these limits in mind:
• Copying from a hard drive will limit the NVMe SSD.
• Copying to a nearly full SSD may be slower.
• Small files usually transfer much more slowly than large files.
• Antivirus scanning can reduce the speed.
• Cloud storage programs may add delay.
• USB enclosures may use a slower USB connection instead of the internal PCIe interface.
Windows may also report a high burst speed at the beginning of a transfer. That speed can fall later when the SSD cache fills. This is normal for many consumer SSDs.

Check the PCIe Link and NVMe Configuration
If your benchmark score is lower than expected, the next step is checking the connection. An NVMe SSD can only reach its rated performance when it has the correct PCIe generation and enough available lanes.
Check Device Manager
Right-click Start and open Device Manager.
Expand Disk drives.
Double-click your NVMe SSD.
Review the device name and driver information.
Windows often uses the standard Microsoft NVMe driver. That is normal. Some SSD makers also provide management software and firmware updates.
Check motherboard specifications
Read your motherboard or laptop manual to confirm:
• Which M.2 slot supports NVMe
• Whether the slot supports PCIe 3.0, PCIe 4.0, or PCIe 5.0
• How many PCIe lanes are available
• Whether using another slot disables or shares bandwidth
Some systems include M.2 slots that support different speeds. One slot may connect directly to the CPU, while another connects through the chipset. Both may work, but their maximum bandwidth can differ.
Use a drive information tool
A trusted hardware information utility can show the current link speed and supported link speed. For example, it may display a connection similar to PCIe 4.0 x4.
The ideal result depends on the SSD. A PCIe 4.0 x4 drive connected at PCIe 3.0 x4 will still work, but its performance will be limited by the slower link.
What NVMe SSD Speed Should You Expect?
When you check NVMe SSD speed in Windows 11, compare the result with the drive’s rated specifications and connection type. Do not compare a short benchmark with the maximum number printed on another drive’s product page.
Typical sequential read ranges include:
• PCIe 3.0 x4: About 2,000 to 3,500 MB/s
• PCIe 4.0 x4: About 4,500 to 7,500 MB/s
• PCIe 5.0 x4: About 9,000 to more than 12,000 MB/s
Entry-level drives may score below these ranges. Laptop models may also run slower to reduce heat and save battery power.
Random performance is harder to compare. It depends on queue depth, thread count, firmware, operating system activity, and the type of NAND flash. A drive with a lower sequential score can still feel just as fast during normal office work.
For everyday Windows use, low access latency and consistent random performance often matter more than peak sequential speed. The fastest benchmark result does not always produce the fastest-feeling computer.
Why Is My NVMe SSD Slower Than Expected?
If how to check NVMe SSD speed in Windows 11 leads to a disappointing result, do not assume the drive has failed. Check the most common causes first.
The SSD is overheating
NVMe drives can become hot during long writes. When the temperature rises, the controller reduces speed to protect the hardware. This is called thermal throttling.
Signs include:
• The first benchmark run is fast.
• Later runs become much slower.
• Performance improves after the drive cools.
A motherboard heatsink or a properly installed M.2 heatsink can help. Make sure the protective film is removed from the thermal pad before installation.
The drive is nearly full
An SSD needs free space for garbage collection, wear leveling, and its write cache. Performance may decline when the drive is almost full.
Try to keep at least 10% to 20% free space. The exact amount depends on the model, but leaving room gives the controller more flexibility.
The test drive is busy
Windows Defender, updates, indexing, backup tools, and cloud services can use the drive in the background. Pause unnecessary activity and repeat the test after the system becomes idle.
The drive uses a slower slot
A PCIe 4.0 SSD in a PCIe 3.0 slot cannot reach full PCIe 4.0 speed. Check the slot’s specifications before changing software settings.
The benchmark settings differ
A manufacturer may use a large test size, an empty drive, and a high queue depth. Your test may use a smaller file and a low queue depth. Both results can be accurate because they measure different workloads.
The SSD cache is full
Many consumer SSDs use a faster temporary cache. After a long write, the cache can fill and the speed may drop. This is expected behavior, especially with large file transfers.

Safe Testing Tips for NVMe Drives
Learning how to check NVMe SSD speed in Windows 11 is safe when you use sensible settings. Benchmarking creates disk activity, so treat it like a short stress test.
Follow these tips:
• Back up important files before testing.
• Use a reputable benchmark from its official download page.
• Do not interrupt a firmware update.
• Avoid running dozens of full benchmark cycles.
• Monitor temperature during long tests.
• Do not defragment an NVMe SSD like a traditional hard drive.
• Keep Windows and SSD firmware updated when the update is trusted and relevant.
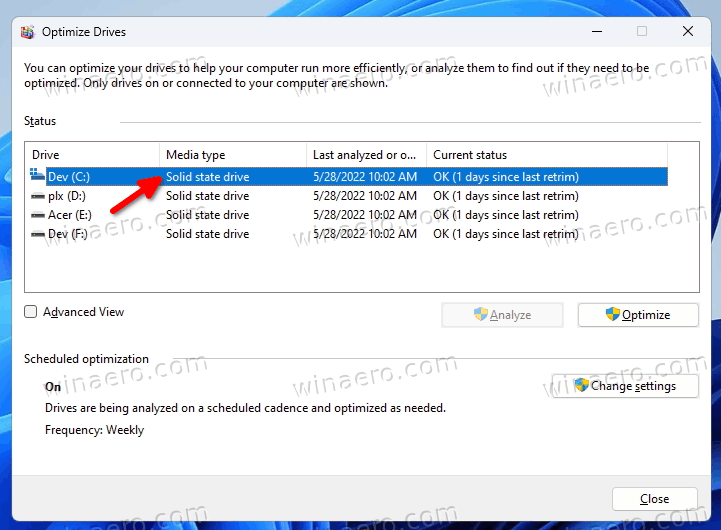
• Use Optimize Drives in Windows 11 for normal SSD maintenance. Windows sends the appropriate TRIM command rather than performing old-style hard-drive defragmentation.
TRIM helps the SSD manage deleted data. It does not make a benchmark score instantly higher, but it supports normal long-term operation.

A Practical Testing Method
For a reliable result, use the same process each time. This makes it easier to compare your SSD before and after a firmware update or hardware change.
Restart Windows 11.
Wait two or three minutes after signing in.
Close active programs and cloud sync tools.
Check that the SSD has enough free space.
Record the drive temperature if your monitoring tool supports it.
Run CrystalDiskMark with the default profile.
Repeat the test once after a short pause.
Compare the sequential and random results.
Check the PCIe link if the score is far below the advertised rate.
Test again after the drive cools.
Do not focus on one number. Look for a pattern. Stable results that match the drive’s connection and class are more useful than a single unusually high score.
In practice, this approach prevents a common mistake: blaming the SSD when the real problem is a slow source drive, background workload, or incorrect M.2 slot.
Frequently Asked Questions
How do I check NVMe SSD speed in Windows 11 without software?
Open Task Manager with Ctrl + Shift + Esc, select Performance, and choose the NVMe disk. You can watch its current read and write activity while copying a large file, but this is not a full benchmark.
What is a good NVMe SSD speed for Windows 11?
A PCIe 3.0 NVMe SSD may reach about 2,000 to 3,500 MB/s, while PCIe 4.0 models often reach about 5,000 to 7,500 MB/s. Your actual result depends on the SSD, PCIe slot, temperature, free space, and benchmark settings.
Why is my NVMe SSD slower than the advertised speed?
Advertised speed usually comes from controlled tests with an empty drive, ideal cooling, and specific benchmark settings. A slower PCIe slot, high temperature, full drive, background activity, or filled write cache can lower your result.
Is CrystalDiskMark safe for an NVMe SSD?
Yes, CrystalDiskMark is widely used for storage testing, but it writes test data to the selected drive. Use it occasionally, avoid unnecessary repeated tests, and back up important files first.
How can I tell whether my SSD is PCIe 3.0 or PCIe 4.0?
Check your motherboard or laptop manual, the SSD specifications, or a trusted hardware information tool. The tool may show the current link speed, such as PCIe 4.0 x4, along with the supported link speed.
Does a faster NVMe SSD make Windows 11 much faster?
A faster SSD can improve large file transfers and some demanding workloads. For normal browsing, office work, and app launches, random performance, latency, CPU speed, and system memory may matter more than peak sequential speed.
Conclusion
The best way to check NVMe SSD speed in Windows 11 is to use CrystalDiskMark for detailed results and Task Manager or WinSAT for quick checks. Always compare the score with your SSD’s PCIe generation, rated specifications, temperature, free space, and test conditions.
If your result seems low, check the M.2 slot, PCIe link, background tasks, drive temperature, and available storage before assuming the SSD is defective. Run a repeatable test, record the results, and use the information to make informed hardware decisions. Share your benchmark experience or explore more Windows 11 storage guides to keep your system running at its best.
