

You can check SSD status with built-in tools, SMART data, or a trusted drive health app.
Learning how to check SSD status helps you spot wear, overheating, errors, and possible failure before your files are at risk. The right method depends on whether you use Windows, macOS, or Linux, but the key readings are similar: health, temperature, total data written, and warning messages. This guide explains each method in simple steps and shows what the results mean.
Why You Should Check SSD Status
An SSD can fail with little warning. Unlike an old hard disk drive, it has no moving parts or clicking sounds to alert you. It may seem fine until the system becomes slow, files become corrupted, or the drive stops appearing.
Learning how to check SSD status gives you an early view of the drive’s condition. It can help you decide when to back up data, update firmware, improve cooling, or replace the SSD.
SSD health tools often report these details:
• Overall health or remaining life
• Drive temperature
• Total data written
• Read and write errors
• Available spare memory
• Power-on hours
• Unsafe shutdowns
• Critical warnings
A healthy SSD does not always mean your data is safe. Health reports estimate hardware condition. They do not replace a current backup.
 <figcaption style="font-size: 14px; color: #555; margin-top: 8px;">
Source: internationalcompetitionnetwork.org
<figcaption style="font-size: 14px; color: #555; margin-top: 8px;">
Source: internationalcompetitionnetwork.org
How to Check SSD Status in Windows
Windows offers several ways to check SSD status. You can use Settings for a quick view, PowerShell for technical details, and a trusted health app for deeper SMART data.
Check SSD Health in Windows Settings
Windows 11 can show basic drive health through the system settings.
- Open Settings.
- Select System.
- Choose Storage.
- Select Advanced storage settings.
- Click Disks & volumes.
- Select your SSD.
- Open Properties.
Look for drive health information, if your hardware and Windows version support it. This screen may show estimated remaining life, temperature, and spare capacity.
The information can be limited. Some SSDs do not share every SMART value with Windows, especially when connected through certain USB adapters or older storage controllers.
Check SSD Status With PowerShell
PowerShell provides a fast built-in method for checking basic SSD status.
- Right-click the Start button.
- Select Terminal (Admin) or PowerShell (Admin).
- Enter this command:
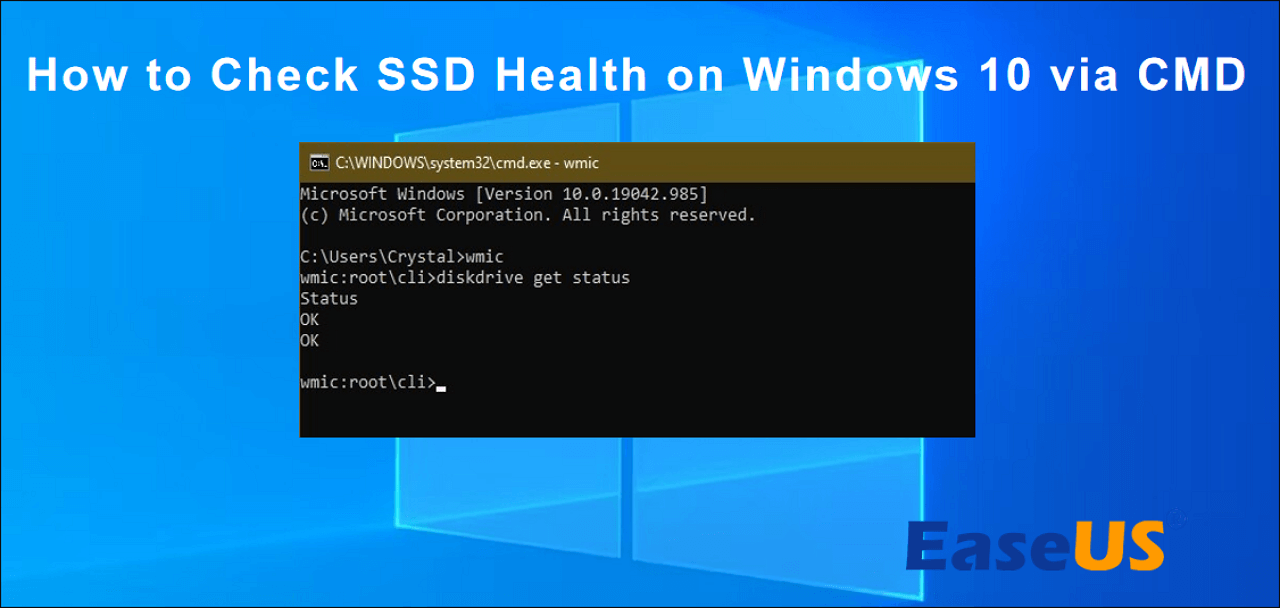
Get-PhysicalDisk | Select FriendlyName, MediaType, HealthStatus, OperationalStatus, Size
Review the results:
• MediaType should identify the drive as SSD.
• HealthStatus should normally say Healthy.
• OperationalStatus should normally say OK.
• Size confirms which physical drive you are viewing.
You can also run:
Get-PhysicalDisk | Get-StorageReliabilityCounter
This may display temperature, wear, read errors, write errors, and total bytes written. Available values vary by SSD model and Windows support.
PowerShell is useful for learning how to check SSD status without installing software. However, it may not show all vendor-specific SMART attributes.
Use a Dedicated SSD Health Tool
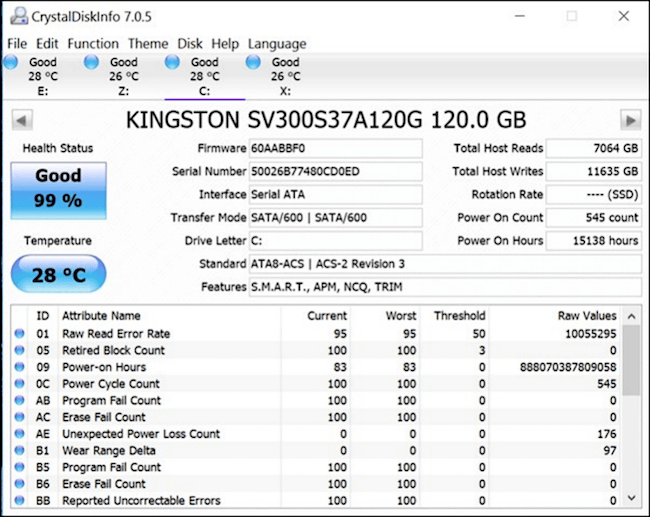
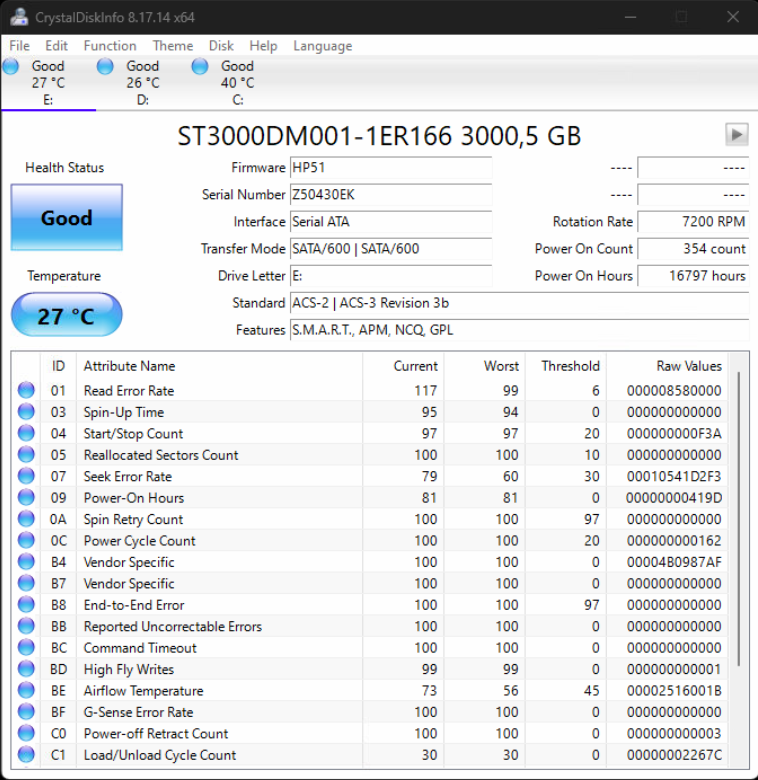
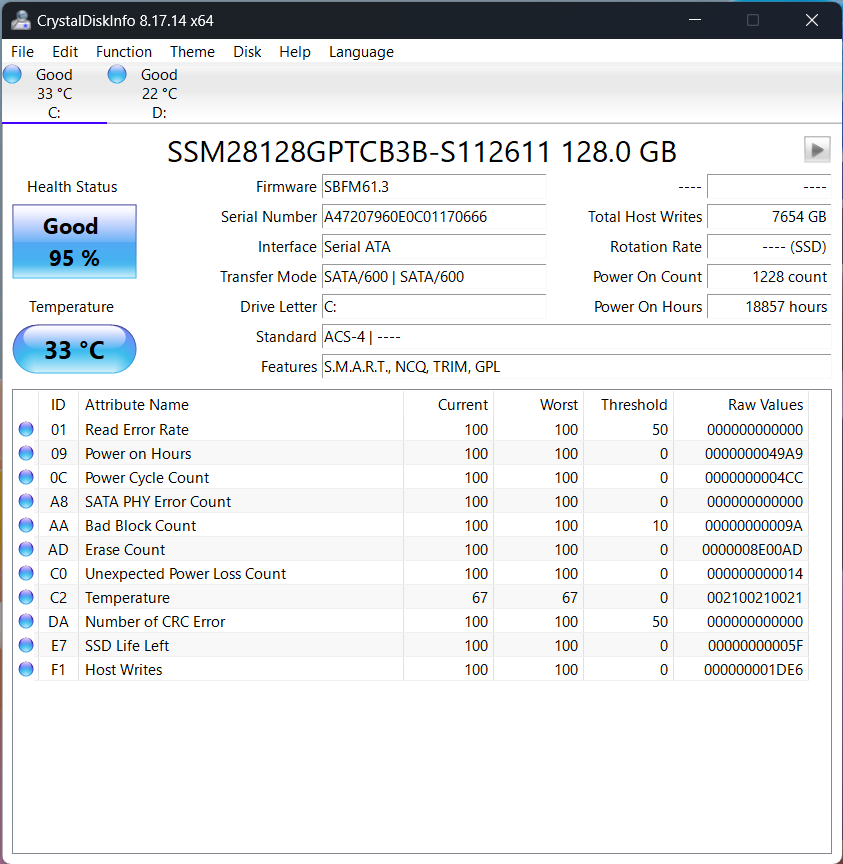
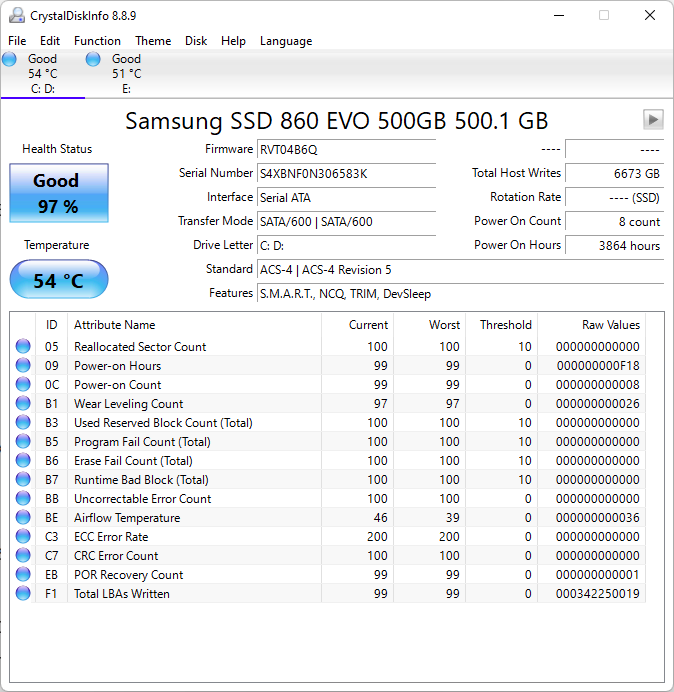
A trusted tool such as CrystalDiskInfo or your SSD manufacturer’s utility can show more detail. Common manufacturer apps include Samsung Magician, Crucial Storage Executive, Kingston SSD Manager, and Western Digital Dashboard.
These tools may show:
• SMART health status
• Percentage used
• Remaining life
• Firmware version
• Drive temperature
• Total host reads and writes
• Self-test results
• Firmware updates
Download software only from the official manufacturer website. Avoid unknown “driver updater” or “PC repair” tools that use fear-based warnings to sell subscriptions.

How to Check SSD Status on macOS
Mac users can check SSD status through Disk Utility, System Information, or Terminal. The method may differ between Intel Macs and Apple silicon Macs.
Use Disk Utility
Disk Utility is the simplest starting point.
- Press Command + Space.
- Search for Disk Utility.
- Open the app.
- Select View.
- Choose Show All Devices.
- Select the physical SSD in the left panel.
- Review the drive details.
You can also click First Aid to check the file system. First Aid can repair some file system problems, but it does not repair worn NAND memory or failing SSD hardware.
If Disk Utility reports that the drive is failing, back up your files at once. Do not rely on repeated repair attempts as a long-term fix.
Check System Information
To view basic storage details:
- Open the Apple menu.
- Select About This Mac.
- Click More Info.
- Choose System Report.
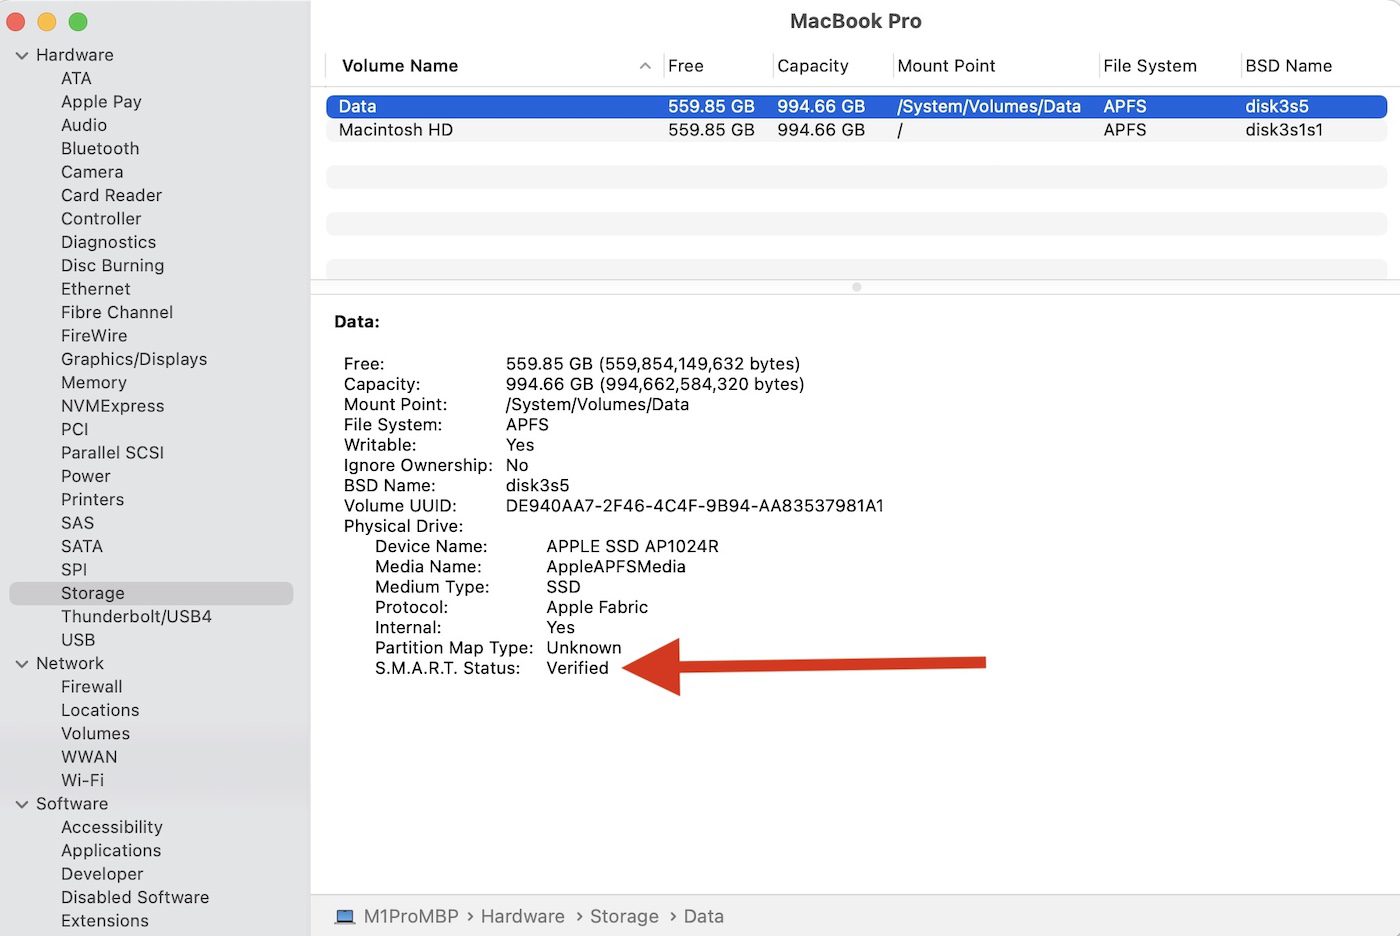
- Select NVMExpress or Storage.
You may see the model, link speed, capacity, and other hardware details. macOS often provides less visible SMART data than Windows tools.
Use Terminal and smartmontools
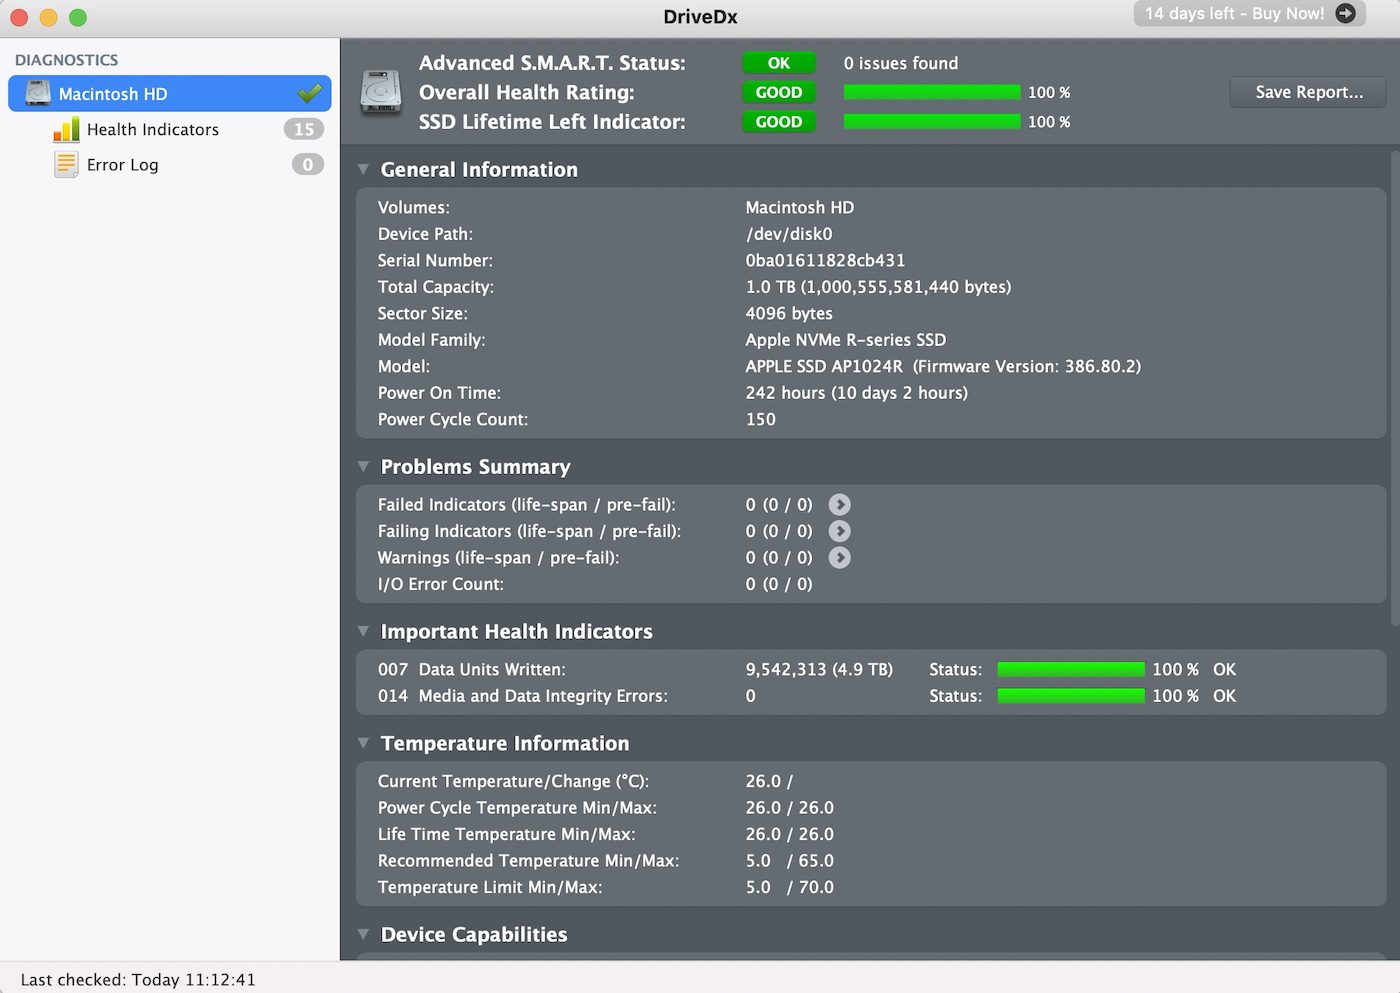
Advanced Mac users can install the smartmontools package through a trusted package manager. After installation, a command may look like this:
smartctl -a /dev/disk0
The correct disk name can vary. Use caution before running commands that modify disks. The smartctl output may include overall health, temperature, error logs, power-on time, and percentage used.
External SSDs can be harder to inspect. Some USB enclosures do not pass SMART data to macOS. In that case, the health report may be incomplete even when the drive works correctly.
How to Check SSD Status in Linux
Linux provides powerful tools for checking storage health. The most common choices are smartctl for SATA and many NVMe devices, and nvme-cli for NVMe drives.
Identify the SSD
Open Terminal and run:
lsblk -o NAME,MODEL,SIZE,TYPE,MOUNTPOINTS
This lists storage devices and their mount points. A SATA drive may appear as /dev/sda, while an NVMe drive often appears as /dev/nvme0n1.
Confirm the device name before running any command. Checking the wrong disk can lead to confusion or data loss if you later use a repair command.
Check SATA SSD Health
Install the SMART utility with your distribution’s package manager. On Ubuntu or Debian, use:
sudo apt install smartmontools
Then run:
sudo smartctl -a /dev/sda
Look for:
• SMART overall-health result
• Percentage used
• Reallocated sectors
• Reported uncorrectable errors
• Media and data integrity errors
• Temperature
• Total data written
A SATA SSD may report attributes with names that differ by brand. Read the drive’s technical documentation when a value seems unclear.
Check NVMe SSD Health
For an NVMe drive, install the NVMe command-line tool:
sudo apt install nvme-cli
Then run:
sudo nvme list
To view health data, use:
sudo nvme smart-log /dev/nvme0
Important values include:
• Critical Warning
• Temperature
• Available Spare
• Percentage Used
• Data Units Read
• Data Units Written
• Media and Data Integrity Errors
• Warning Temperature Time
A Critical Warning value of zero is usually a good sign. A nonzero value needs attention, especially when paired with rising errors or a sudden performance problem.
How to Read SSD Health Results
SSD tools use different labels, so the results can feel confusing. The most important step in learning how to check SSD status is knowing which readings matter most.
Health or Remaining Life
Health may appear as:
• Good
• Healthy
• Passed
• 100 percent remaining
• Percentage used
• Remaining life
Some tools show the life already used, while others show the life remaining. For example, “Percentage Used: 15” usually means the drive’s estimated endurance is 15 percent used, not that only 15 percent remains.
These estimates are based on the manufacturer’s endurance model. They are useful, but they are not a precise countdown clock.
Total Bytes Written
Total bytes written, or TBW, measures how much data the SSD has written during its life. SSD manufacturers often rate drives for a specific endurance level, such as 300 TBW or 600 TBW.
Passing the rated TBW does not mean the SSD will fail immediately. Some drives continue working well beyond that point. Still, high write totals can help explain a low life estimate.
Temperature
Most SSDs work best within a moderate temperature range. Heavy workloads can raise the temperature, especially in laptops, compact desktops, and systems with poor airflow.
A short temperature spike during a large file transfer is not always a problem. Constantly high temperatures may cause thermal throttling, which reduces speed and can increase wear over time.
Error Counts
Pay close attention to:
• Uncorrectable errors
• Media errors
• Critical warnings
• Failed self-tests
• Reallocated or bad blocks
• Interface communication errors
One isolated interface error may come from a loose cable or poor enclosure. Repeated errors, failed tests, or a growing count suggest that you should back up the drive and investigate further.
SSD Status: Healthy, Warning, or Failing
A health label should be read with the full report. One word does not tell the entire story.
Healthy
A healthy SSD usually has:
• No critical warnings
• No uncorrectable errors
• Stable temperature
• A normal operating status
• No sudden performance changes
• A reasonable remaining-life estimate
Continue using the drive, but keep regular backups.
Warning
A warning can mean the SSD has increased wear, high temperature, limited spare capacity, or a growing error count. It does not always mean immediate failure.
Back up important files first. Then check firmware, airflow, cable connections, and recent system changes. Monitor the same values again after a few days.
Failing
Treat the SSD as failing when a tool reports:
• Critical warning
• SMART failure
• Failed self-test
• Uncorrectable media errors
• Missing or disappearing drive
• Corrupted files
• Frequent crashes during file access
Stop using the drive for anything important. Copy data to a safe location if the drive remains readable. If copying causes errors, make a full image with a recovery tool instead of repeatedly opening files.
What to Do If Your SSD Shows Problems
Knowing how to check SSD status is only useful if you act on the results. Start with your data, not with repairs.
- Back up important files to another drive or secure cloud storage.
- Stop storing new files on a drive that reports critical errors.
- Check the SSD’s cables, slot, and power connection.
- Review the drive temperature.
- Install firmware only from the official manufacturer.
- Run a file system check when the hardware health is still stable.
- Replace the SSD if errors continue or the health status is failing.
Do not repeatedly run intensive benchmarks on a failing drive. Benchmarks create extra reads and writes and may make data recovery harder.
I have seen many people wait because a computer still boots. That is a risky test. A drive can boot normally while silently losing files, so a warning should always trigger a backup plan.

How Often Should You Check SSD Status?
For a personal computer, checking SSD status every few months is usually enough. You should also check after a crash, a sudden slowdown, unusual heat, or a system message about storage.
Check more often when the SSD stores business files, creative projects, virtual machines, or an operating system that cannot be easily replaced.
A simple routine works well:
• Check health every three months.
• Watch temperature during heavy work.
• Keep at least two copies of important files.
• Review warnings after a power outage.
• Replace drives that show repeated errors.
Backups matter more than any health score. The best backup plan includes one copy on a separate device and another copy in a different location.
Common Mistakes When Checking SSD Status
Several mistakes can lead to a false sense of security.
Checking the Wrong Drive
Many computers contain more than one drive. Always confirm the model and capacity before reading the result. A healthy secondary drive does not prove that the system drive is healthy.
Trusting One App Completely
Different apps may interpret SMART data in different ways. If one tool reports a warning, compare it with the manufacturer’s utility or a command-line report.
Confusing Free Space With Drive Health
Low free space can slow a computer, but it does not automatically mean the SSD is failing. Health data concerns hardware wear and errors, while free space concerns capacity and file management.
Ignoring Backups
A “Good” status is not a backup. Software bugs, theft, power damage, accidental deletion, and malware can affect a healthy SSD.
Using Unsafe Repair Commands
Commands that erase partitions, reset drives, or secure-erase data cannot be undone easily. Read the documentation and confirm the target drive before using them.
SSD Health Limits You Should Know
SSD health tools are helpful, but they are not perfect. Some external enclosures hide SMART data. Some RAID controllers report the health of the array rather than each physical SSD. Virtual machines may also show limited information.
Health estimates can vary between brands. A drive may report 98 percent health for years and then develop a controller fault without much warning. Another drive may report a low remaining-life figure but continue working reliably for a long time.
This is why how to check SSD status should include several clues:
• SMART or NVMe health data
• Operating system warnings
• File system errors
• Temperature history
• Sudden speed changes
• Drive detection problems
• Backup and recovery results
Use the report as an early warning system, not as a guarantee.
Frequently Asked Questions About How to Check SSD Status
How do I check SSD status without installing software?
On Windows, open PowerShell as an administrator and run Get-PhysicalDisk. On macOS, use Disk Utility, and on Linux, use smartctl or nvme smart-log when supported.
What is a good SSD health percentage?
A high health percentage with no critical warnings or uncorrectable errors is generally a good sign. The exact meaning depends on whether the tool shows life remaining or percentage used, so check the label carefully.
Can an SSD fail without showing a warning?
Yes. A controller fault, sudden electrical damage, firmware issue, or communication problem may cause failure without a clear health warning. Keep current backups even when the SSD status appears normal.
How do I check SSD status on an external drive?
Connect the drive directly when possible, then use the manufacturer’s utility or a SMART tool. Some USB adapters do not pass health data, so an incomplete report does not always mean the SSD is unhealthy.
Does low free space mean my SSD is failing?
No. Low free space usually means the drive is nearly full, not that the hardware is damaged. Free some space for better system performance, but check SMART or NVMe data separately for health concerns.
Should I replace an SSD when its health reaches zero percent?
You should plan to replace it before or as soon as the tool reports zero remaining life, especially if the drive stores important data. Back up the files first and avoid treating the drive as reliable storage.
Conclusion
Learning how to check SSD status is a simple way to detect wear, heat, errors, and warning signs early. Windows, macOS, and Linux each provide useful tools, while manufacturer utilities and SMART reports offer deeper detail.
Check the correct drive, read more than one health value, and treat critical warnings seriously. Most importantly, keep reliable backups because no SSD health report can promise that your files are safe. Check your drive today, protect your important data, and explore your SSD manufacturer’s support tools for the most accurate report.
